How To Create a Snake Game
Ok, you’ve installed the MonoGame to create the game of your dreams, but you don’t know where to start? Here’s a good point.
Before diving in, make sure you’ve checked out my installation guide for MonoGame. It covers how to set up both the modern and legacy versions of MonoGame, depending on your hardware and preferences. While this guide assumes you’ve completed that setup, don’t worry—I’ll remind you of key steps along the way.
I’m going to help you create a simple Snake Game and i hope you leave here full of questions and curiosity.
Although this tutorial is for beginners, i hope you have at least a basic knowledge of programming, but if you don’t even know what i’m talking about, take a break, learn a bit and come back here later.
If you don’t know where to look for learn about programming (with C# more specifically) here are some places (Ctrl + Click to open in a new tab):
For this project, I’ll be using Visual Studio 2015 and MonoGame 3.7.1 (Legacy). But don’t worry! If you’re using newer tools like Visual Studio 2022 or MonoGame 3.8, this guide is fully compatible, and I’ll point out any differences along the way.
The reason I chose Visual Studio 2015 and MonoGame 3.7.1 (Legacy) for this guide is simple: accessibility. When I started learning game development, I had limited hardware and struggled to find tutorials that were either not too outdated or overly reliant on modern tools. This guide is designed to bridge that gap. If you’re in the same boat, this setup will work just fine. And if you’re using newer versions, don’t worry—the core concepts and code here are fully compatible.
One of the cool things about this guide is that I’ve included side-by-side comparisons for any differences between modern and legacy versions. Whether you’re using MonoGame 3.8 or 3.7.1, I’ll guide you step-by-step and show you exactly how to proceed in each case—with images to make it > crystal clear.
If you don’t know how to create a project and run it with Visual Studio or Visual Studio Code read my post about the
installation proccessin both environments.
Creating A New Project
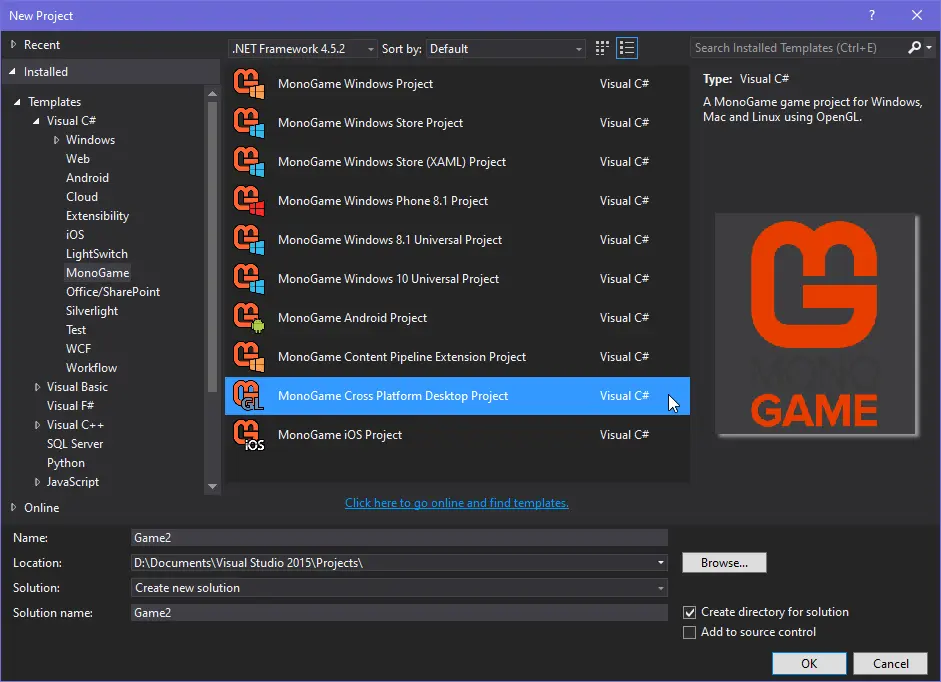
Initialize a new project:
-
MonoGame Windows Project: Will create the project using DirectX as backend (you may lose compatibility with Mac and Linux)
-
MonoGame Cross Platform Desktop Project: Will create the project using OpenGL as backend (it is compatible with various platforms, but has less performance in Windows environments compared to DirectX)
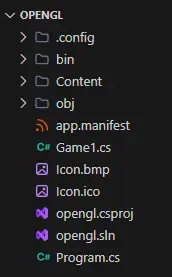
Differences In Project Structure
Legacy MonoGame
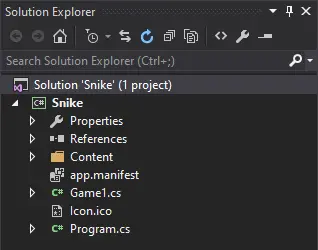
MonoGame Windows Project (DirectX)
MonoGame Cross Platform Desktop Project (OpenGL)
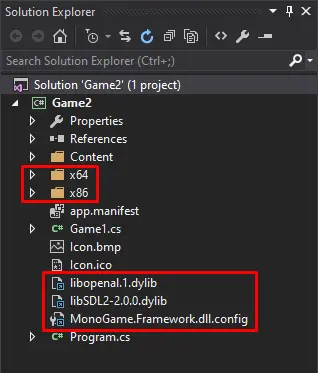
In the template with OpenGL you’ll probably notice the existence of two new directories and three or more additional files.
The template with DirectX doesn’t have these files because they are only needed in the context of multiplatform.
You will (and can) ignore their existence in the short and medium term, specially if you’re working in (and for a) Windows environment.
Modern MonoGame
MGWindowsDX
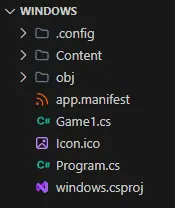
MGDesktopGL
Unlike legacy templates, there isn’t much difference between the modern template with OpenGL and the modern template with DirectX.
In general, this’s all you need to know so far.
Window
Open the file Game1.cs:
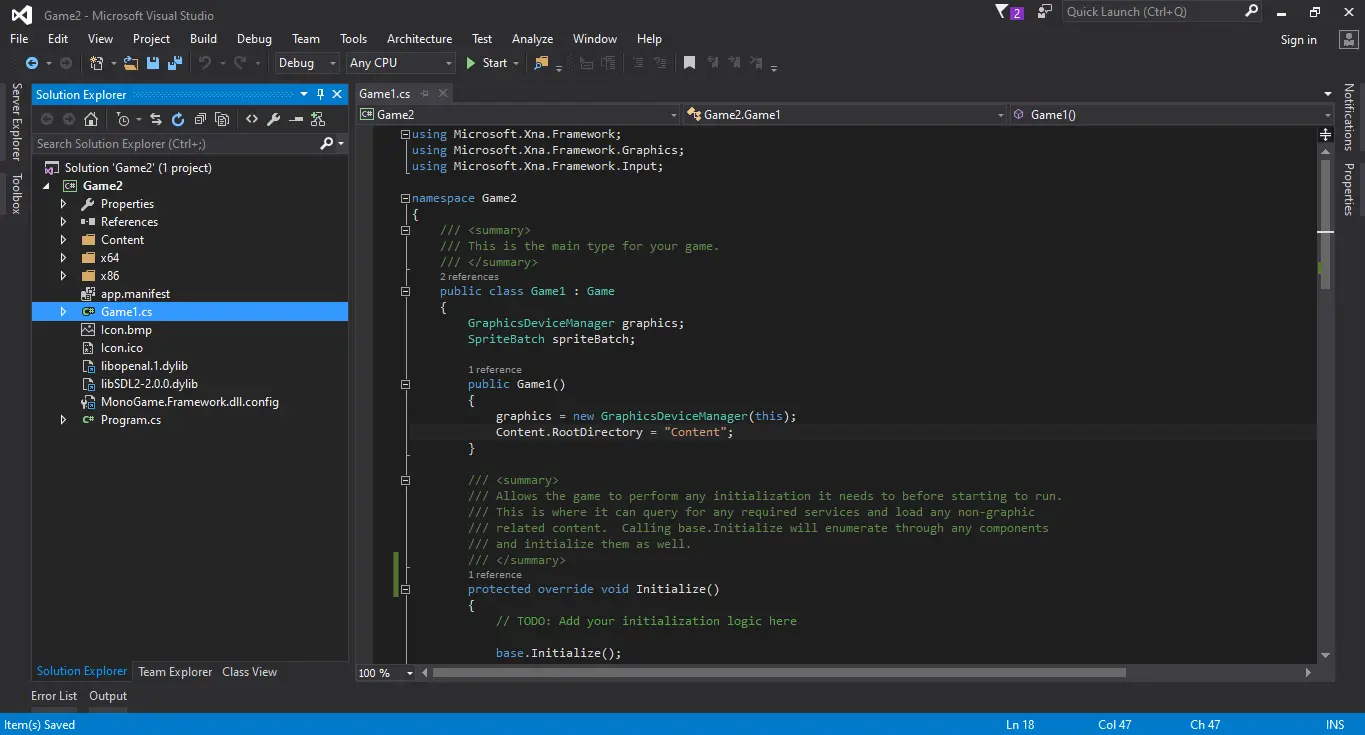
Since XNA (MonoGame’s almost twin brother) it’s common to see these comments above the standard methods of this file.
In modern templates, these comments no longer appear.
I usually remove them:
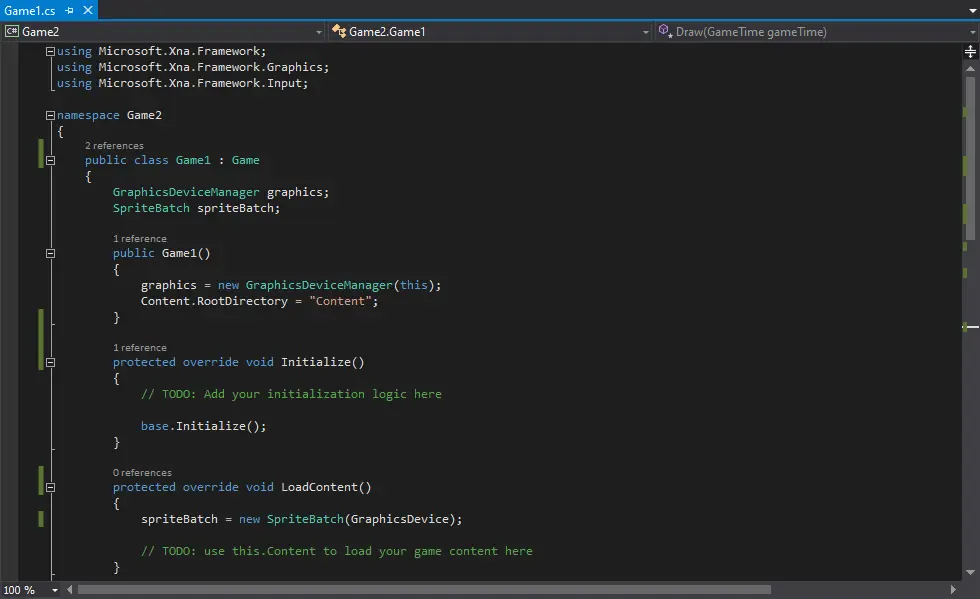
Normally, i just keep the comments inside the methods as a reminder of where i should write the code.
By the way, this is a class file and the class in question is the Game1 class with is child of the Game class:

For now, you just need to know that this is the main file of your game and is here where you will connect all the pieces of your “puzzle”.
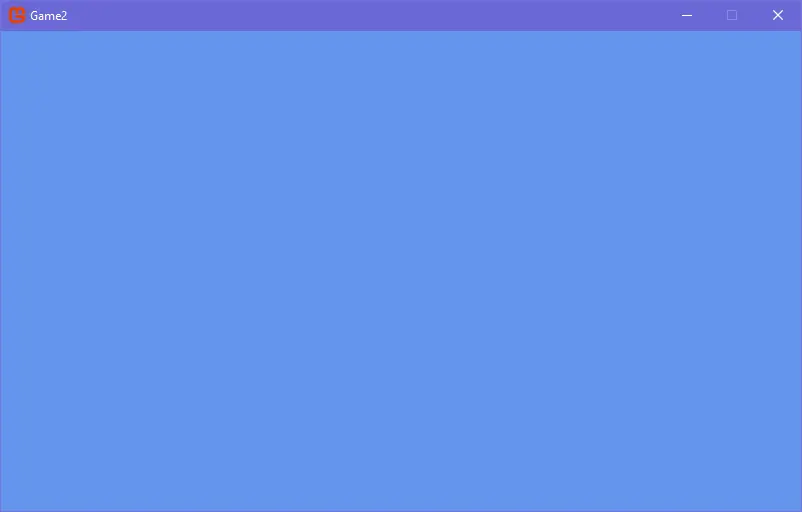
If you run your project, you can see what your project currently is:
Changing Cursor Visibility
In legacy MonoGame, the cursor is hidden when you move it over the game window (this doesn’t happen if you’re using modern MonoGame).
To make the cursor visible set the inherited property IsMouseVisible to true inside the constructor method:
...
public Game1()
{
	graphics = new GraphicsDeviceManager(this);
	Content.RootDirectory = "Content";

	IsMouseVisible = true;
}
...
or in the Initialize method:
...
protected override void Initialize()
{
    IsMouseVisible = true;

    base.Initialize();
}
...
Changing the Window Title
If you want to change the title of the window, simply set Window.Title to another string value within the Initialize method:
...
protected override void Initialize()
{
    IsMouseVisible = true;
    Window.Title = "My Snake Game";

    base.Initialize();
}
...
In the legacy MonoGame when you’re using a template with OpenGL, you can only change the window title within the
Initializemethod, but when you’re using a template with DirectX, you can change the windows title in bothInitializemethod and the class constructor.This problem doesn’t occur in modern MonoGame whether with OpenGL or DirectX, and you can change the window title within any of the methods mentioned above.
Drawing a Rectangle
MonoGame, in both legacy and modern versions doesn’t have native methods for drawing primitive shapes such as squares or ellipses, so we need to do a bit of work.
There are a few ways to draw a square, but i’m going to choose the most simplest way, which consists of resizing a pixel (yes, a single and simple pixel).
Use any online image editor and create a 1x1px image (yes just one pixel) and fill it with a white background or download this image from this project github repository.
Do you already have the image? So now we need to import it into our project.
MonoGame Content Pipeline
With this tool you can import and optimize assets to use in your project (such as sounds, fonts and 3D models).
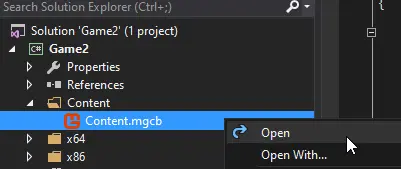
Visual Studio
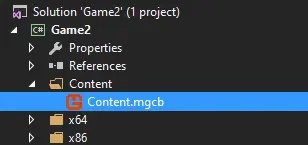
In Visual Studio expand the Content directory, right-click the Content.mgcb file and click Open:
Visual Studio Code (VSCode)
Open a terminal in the same directory as your project, type and run dotnet mgcb-editor:

If you want to skip the whole following process, instead of just typing
dotnet mgcb-editor, you can rundotnet mgcb-editor ./Content/Content.mgcb.This way, you will open the MGCB Editor with the file
Content.mgcbalready loaded onto it.
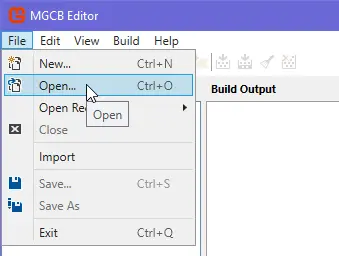
with MGCB Editor open, in the menu bar click on File and then Open…:
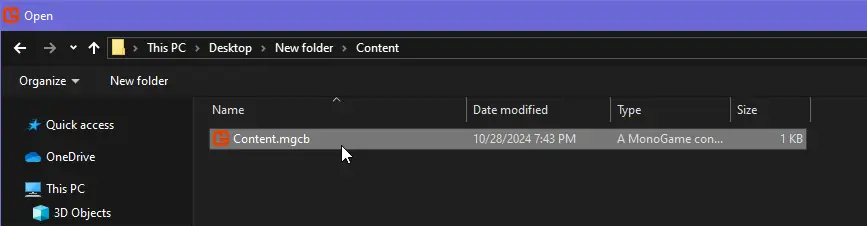
Go manually to your project directory and open the Content.mgcb file:
Importing The Image
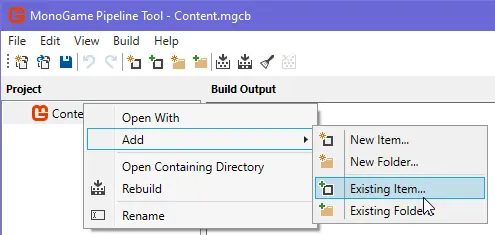
In the MonoGame Pipeline Tool (or MGCB Editor) right-click on Content file in the Project section, go to Add and then click on Existing Item…:
Navigate to the directory where the pixel image you downloaded earlier is located:
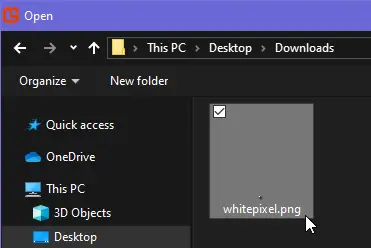
This prompt will probably appear for you:
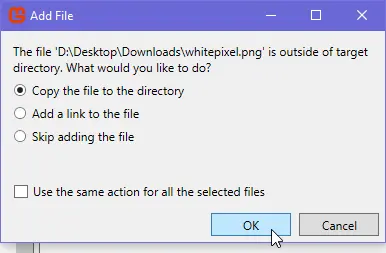
- Copy the file to the directory: Will create a copy of the original image within your project.
- Add a link to the file: Will only create a link to the original image.
In most cases, you’ll use the first option, because if you accidentally remove the original image or move it to another location the reference/link will be lost and you’ll have problems.
So leave it at the first option and click OK.
If you right-click on the imported image, you can rename it, but keep the original name for now.
In the menu bar, expand the Build menu and then click on Build again or, in the toolbar, click on the first icon shown in the image below (both do the same thing):
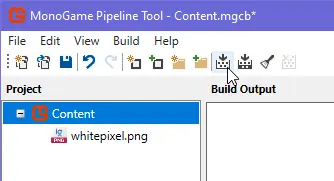
This will “compile” the image into format optimized for use in our game:
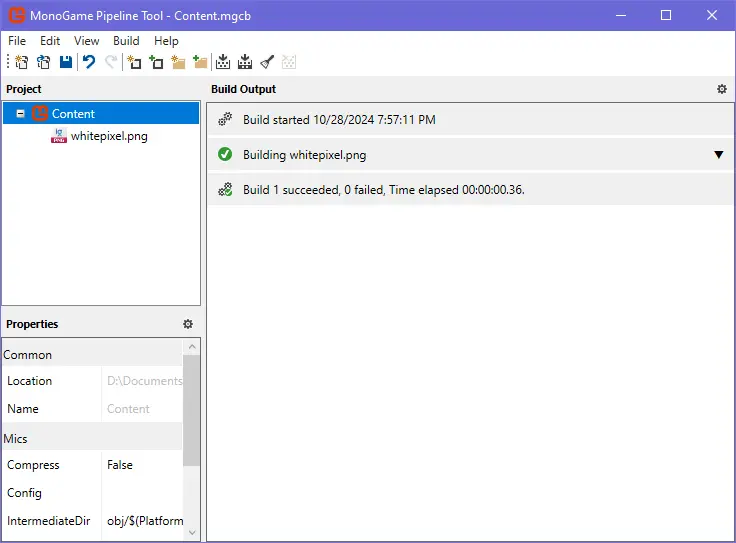
If everything goes well so far, we can close the content pipeline.
Optimized File of the Image
Visual Studio Code (VSCode)
If you look in the Content directory, you’ll see that there is a file called whitepixel.webp which is a copy of the original image:
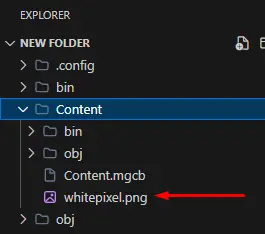
And if you look inside bin\DesktopGL (in the template with OpenGL)
You should find a file with extension .xnb which, if you didn’t rename anything during the import, should have the same name as the original image:
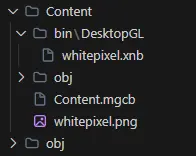
Just be aware that when you load an image into your game, you’re not loading the raw image file (the .webp file), but the optimized version (the .xnb file).
If you have renamed the image in the pipeline the image to Pumpkin (for example), the original copy of the image will remain with the original name, but the optimized version will have the name Pumpkin and when you load it, you should use the name Pumpkin.
Visual Studio
In (my) Visual Studio 2015, files added externally to my project are not displayed immediatell and, if you are using the same version you may get the impression that nothing has been added.
However, in the toolbar, just above the Solution Explorer, you can find a small icon which, when enabled, allows you to see hidden files:
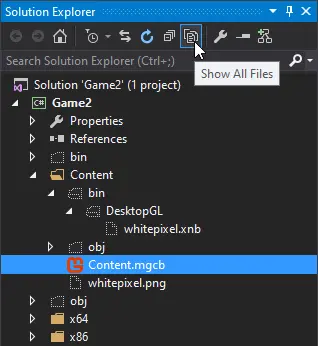
And, as you can see, we have two files: the original image (.webp file) and the optimized version that we will use to load the image (.xnb file).
Loading Texture
At the top of the Game1.cs class, create a new property of type Texture2D:
...
public class Game1 : Game
{
	GraphicsDeviceManager graphics;
	SpriteBatch spriteBatch;

	Texture2D whitepixel;
	...
So far, all you just need to know is that when you want to load any kind of image into your project, you’ll use a Texture2D (almost always)
(or a Texture3D, if you’re working on a 3D game).
And within the LoadContent method, we will load our image:
...
protected override void LoadContent()
{
	spriteBatch = new SpriteBatch(GraphicsDevice);

	whitepixel = Content.Load<Texture2D>("whitepixel");
}
...
If you don’t understand much here, don’t worry, just know that in most cases you’ll load your images in the same way as above.
Note that we have enclosed in double quotes the name whitepixel which corresponds to the optimized file whitepixel.xnb.
And again: when importing the image using the content pipeline, if you had renamed the file to potato_girl you should use that same name to load your texture (
Content.Load<Texture2D>("potato_girl")) even if the original file have a different name.
Now, let’s finally draw our square.
Drawing
Within the Draw method, let’s type:
...
protected override void Draw(GameTime gameTime)
{
	GraphicsDevice.Clear(Color.CornflowerBlue);

	spriteBatch.Draw(whitepixel, new Vector2(100, 100), Color.White);

	base.Draw(gameTime);
}
...
Nice, try running your project and… BOOM 💥
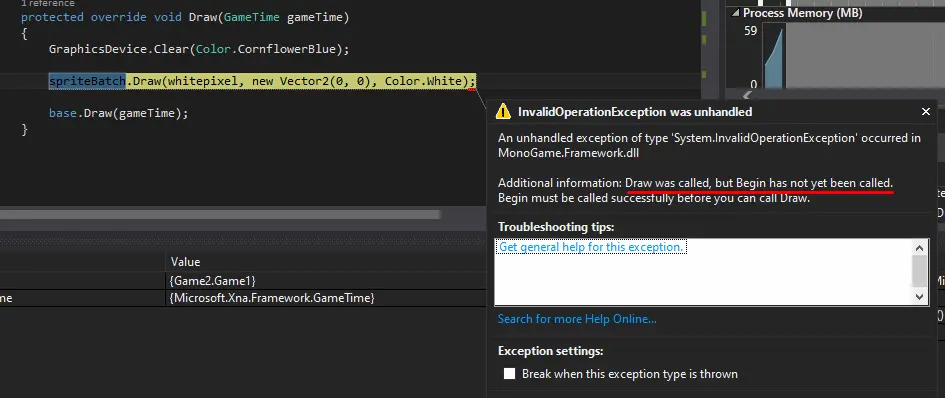
Congratulations, you’ve just conquered your first error (or thrown exception) 🥳🎉
Whenever we want to Draw something, we use this spriteBatch method.
On Legacy MonoGame, this property is named
spriteBatchand, in Modern MonoGame, it is probably named_spriteBatch(with an underscore at the beginning).
What is happening here is that MonoGame isn’t keen on drawing each thing at a time, it prefers to accumulate lots of things and draw them all at once.
What’s missing here is to call Begin to tell it where the SpriteBatch should start to accumulating things to draw and End
to tell it when it should stop from accumulating and finally draw:
...
spriteBatch.Begin();
spriteBatch.Draw(whitepixel, new Vector2(100, 100), Color.White);
spriteBatch.End();
...
By the way, if you forget to call the
Endmethod you’ll probably get an exception like: Begin cannot be called again until End has been successfully called.
The only thing you need to know here is that you will always call the Draw method between the Begin and End methods.
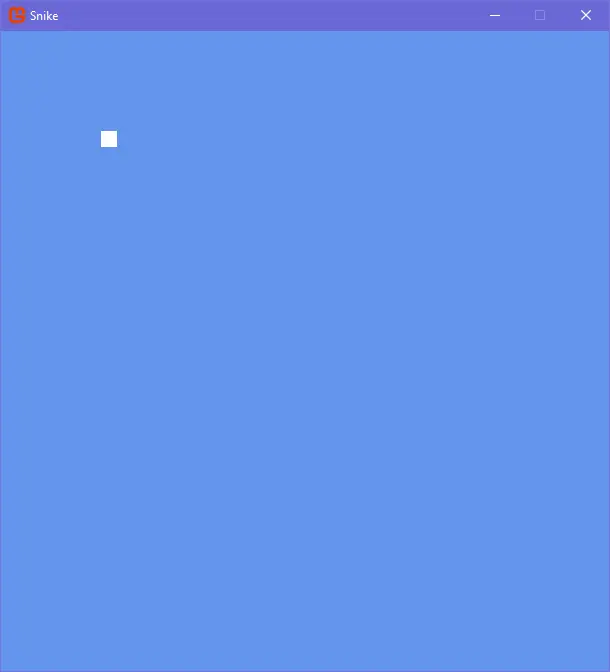
Now, if you run the project:
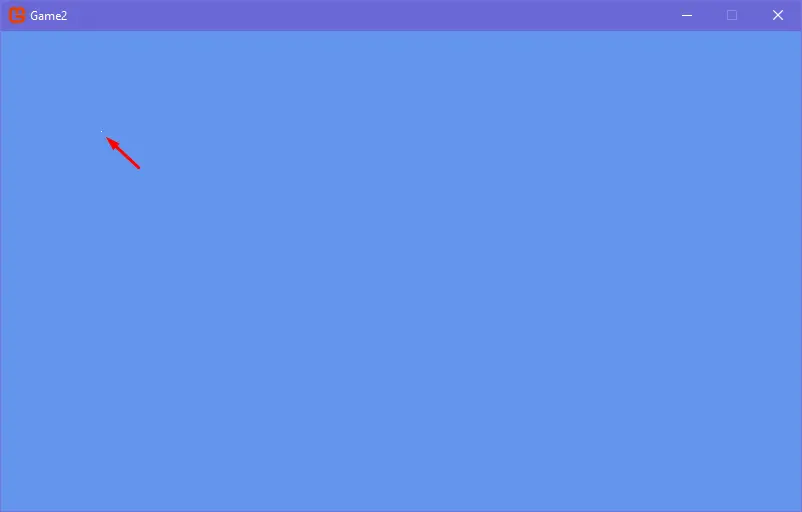
Everything should works as expected and… yes, that miserable little dot being pointed by the red arrow is our image.
Is it just a ridiculous little dot? Yes, but it’s also a square, so tecnically i fullfiled my promise 😎
Before we turn this into a real square, let me show you a few things first about the things we used in the Draw method:
-
texture: is the texture we loaded at the beginning.
- Whenever you want to draw some texture, you must first load it into
LoadContent, store it in a property or variable that can be used later and pass it as first argument to theDrawmethod.
- Whenever you want to draw some texture, you must first load it into
-
position: is the position in which our image will be drawn.
Vector2is astructure native to MonoGame that has two properties:XandY.- You just need to know that this structure contains two properties that generally refers to the position of something.
- Imagine we have two objects: and Object A and an Object B. If the
Xof Object A is 0 and theXof Object B is 10, this means that Object B is 10 units to the right of the Object A (really try to imagine this scenario). - Be Curious like a kid (!) and change these values, cause bugs and run tests, you only really learn by practicing.
- Imagine we have two objects: and Object A and an Object B. If the
-
color: is the color that will tint the texture, not necessarily the color of the texture.
My dear, don’t worry if everything seems confusing so far, with time and practice, everything will seem like a simple game to you 😌
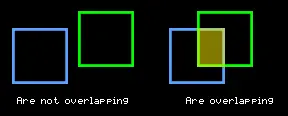
The type of value we used to define the position of our image is a Vector2, but we can use another type: Rectangle.
A Rectangle is a structure that contains many useful properties such as position (X and Y),
dimension (Width and Height), sides (Left, Top, Right, Bottom) and some methods such as Intersects to check
if there are two overlaping rectangles.
Using this struct in the Draw method can be very useful because we can apply croppings to the image and/or resize it.
This is the declaration of a rectangle: Rectangle(x, y, width, height) and unlike from Vector2, Rectangles
only accept integer values.
// before:
spriteBatch.Draw(whitepixel, new Vector2(100, 100), Color.White);
// later:
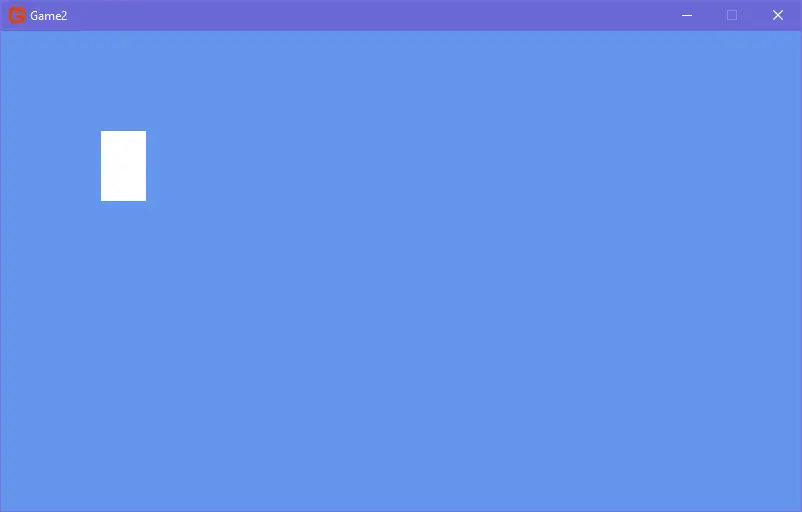
spriteBatch.Draw(whitepixel, new Rectangle(100, 100, 45, 70), Color.White);
And, if we run our project now:
By the way, these different ways of calling the same method are called Overloads. If so far you don’t know what this means, you really need to learn more about C#.
Note that we used the same position values as Vector2(100, 100) in the rectangle declaration.
When you decide to use a rectangle instead of a Vector2, the Draw method will position the
image using the X and Y properties of the rectangle itself.
Also note that, for some reason our little pixel has turned into a big square (or, more specifically, a rectangle). This is
because when you use a Rectangle instead of a Vector2, the Width and Height properties of the structure
are also applied over the image resizing it.
And yes, you can basically use this to resize any image.
Making the Rectangle Move
Let’s make our image move around, it will hit some position, turn around, will move to another position, turn around move again and so on.
See how our Draw method currently looks:
...
protected override void Draw(GameTime gameTime)
{
	GraphicsDevice.Clear(Color.CornflowerBlue);

	spriteBatch.Begin();
	spriteBatch.Draw(whitepixel, new Rectangle(100, 100, 45, 70), Color.White);
	spriteBatch.End();

	base.Draw(gameTime);
}
This method is usually run at 60 FPS, in other words, it is run 60 times every second, which means that it is impossible to move this square, because every second all it’s values are redefined.
We need to make some of these values variables.
Outside of the Draw method set two new variables and replace the literal values in the declaration of the
rectangle by their respective variable:
...
int x = 100;
int y = 100;
protected override void Draw(GameTime gameTime)
{
	GraphicsDevice.Clear(Color.CornflowerBlue);

	spriteBatch.Begin();
	spriteBatch.Draw(whitepixel, new Rectangle(x, y, 45, 70), Color.White);
	spriteBatch.End();

	base.Draw(gameTime);
}
Now in any place of that method we can do this:
...
int x = 100;
int y = 100;
protected override void Draw(GameTime gameTime)
{
	x += 5; // this is equivalent to x = x + 5
	GraphicsDevice.Clear(Color.CornflowerBlue);

	spriteBatch.Begin();
...
If x starts as 100, then x += 5in the next moment will be 105, and in another will be 110 and so on.
Ok, if you run your project now:
Ok, but our rectangle are moving to the right and… leaving to the beyond and forever.
Making the Rectangle Turn Around
Lets avoid that:
...
int x = 100;
int y = 100;
protected override void Draw(GameTime gameTime)
{
	x += 5;
	if (x > 400)
	{
		x -= 5;
	}
	...
Ok now, when we execute, the rectangle should to move right and when it reaches some value beyond 400px it needs to turn around and move to the left:
Hm… By some reason our rectangle are simply stopping… but why? 🤔
That is happening because of the order of each statement:
1. First we are adding 5 to the X axis of our rectangle to create a illusion of movement to the right
2. In every frame checks if the X axis of our rectangle are beyond 400px
1. If the above condition is true, then decrease by 5 pixels to create a illusion of movement to the left
Have you already realized what is the problem? In a moment we are adding 5 to our X axis and in another,
when our Rectangle exceeds 400px we subtract 5 from our X axis.
The problem is that we are executing these two operations at the same time:
x = 405

-- frame 1
x = x + 5 = 410 -- 405 + 5 = 410
x = x - 5 = 405 -- 410 - 5 = 405

-- frame 2
x = x + 5 = 410 -- 405 + 5 = 410
x = x - 5 = 405 -- 410 - 5 = 405
...
To solve this, lets turn 5 into a variable also and multiply that variable by -1 when the X exceeds 400px:
...
int x = 100;
int y = 100;
int speed = 5;
protected override void Draw(GameTime gameTime)
{
	x += speed;

    if (x > 400) speed *= -1; // equivalent to speed = speed * -1;

	...
and if we test it now:
Making the Rectangle Turn Around Again
Really nice, but our rectangle are moving beyond the screen and abandoning us again 😥
Lets do the same thing that we did to the right, to the left:
...
if (x > 400) speed *= -1; // equivalent to speed = speed * -1;
if (x < 100) speed *= -1;
...

Since (x > 400) speed *= -1 and (x < 100) speed *= -1 do the exact same thing we can unify that expression
in just one using a boolean or operator:
...
if (x > 400 || x < 100) speed *= -1;
...
That means: if x be greater than 400px or less than 100px then invert the signal of the speed variable
Here are a illustration of how that are working:
x = 400
speed = 5

-- frame 1
x = x + speed -- result: 405 because 400 + 5 = 405

if x > 400 then: speed = speed * -1 -- speed = -5

-- frame 2
x = x + speed -- result: 400 because 405 + (-5) = 400

-- frame 3
x = x + speed -- result: 395 because 400 + (-5) = 395
Really cool, now the rectangle is trapped close to us 🥰
Organization
By the way, have you notice that there is a method called Update?
Is in that method that we should do all that operation, so lets move all this logic to there:
You can also move the variables to the top of the Game1 class.
Texture2D whitepixel;

int x = 100;
int speed = 4;

...

protected override void Update(GameTime gameTime)
{
    if (GamePad.GetState(PlayerIndex.One).Buttons.Back == ButtonState.Pressed || Keyboard.GetState().IsKeyDown(Keys.Escape))
        Exit();

    x += speed;
    if (x > 400 || x < 100) speed *= -1;

    base.Update(gameTime);
}

// variables was here
protected override void Draw(GameTime gameTime)
{
    // the statements was here

    GraphicsDevice.Clear(Color.CornflowerBlue);
    ...
}
And now, if you run your project, everything should works exactly as before.
For a question of organization, prefer to write all the logic that don’t have straight relations with drawing
inside of the Update method.
That’s how we’re going to do it from now on.
Understanding Our Game
- Our snake will be made up of several small 16x16px squares.
- It will move every 16 pixels, as if it were perfectly aligned with a grid.
- It will move in a limited space
- If it hit any wall or itself, the player loses.
- If it eats the fruit, it will get a new square on its tail of 16 by 16px
- The fruit should bew positioned randomly in the snake’s limited area.
- Player earns 1 point for each fruit eaten.
To proceed, clean up everything we did earlier, except for importing the whitepixel texture, or create a new project, import and load this image!
Everything we’ve done before is just to give you a little taste of how MonoGame works, but don’t worry, it will all be used.
Adjusting the Window Size
First, let’s set the window size for 608px wide and 640px high:
...
public Game1()
{
	...

	IsMouseVisible = true;

	int windowWidth = 608;
	int windowHeight = 640;
	graphics.PreferredBackBufferWidth = windowWidth;
	graphics.PreferredBackBufferHeight = windowHeight;
}
...
Why specifically these values? In fact, you can use any value, however, these values i have chosen are not as random as you might think, let me explain…
The snake will have small 16x16px squares that will forms its body.
If we multiply 16 by any arbitrary value, the result is a multiple of 16, which means that, as the snake will move every 16 pixels, regardless of where it is, it will always be aligned with the size of the screen.
For example, if the snake moves to the edge of the screen it will align perfectly with the edge.
Following this logic, i multiplied 16 by 18, which results in 608 (window width) and 16 by 40 (window height).
18 and 40 are completely arbitrary, you can choose any value, but keep these values for now.
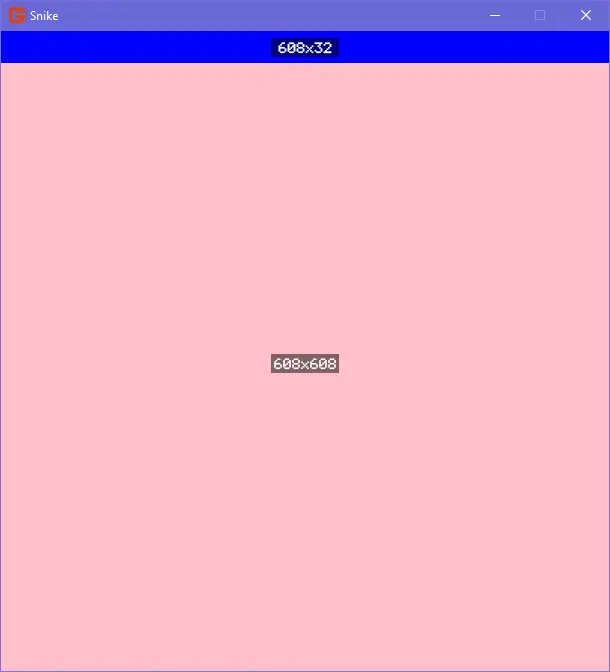
The area that the snake will be able to move around is exactly a 608x608px square, and you might think: So why 640 high instead of 608? Well, that’s because i want to reserve a small space at the top of the windows to place the score text and not just throw it in the middle of the game screen.
Basically, that’s the layout of the game:
Creating Our Snake (Snake Head)
Creating a Rectangle and Understanding Positioning
Remember how we created our moving rectangle earlier? We’ll do the exactly same thing here.
Let’s create a Rectangle variable at the top of our main class:
public class Game1 : Game
{
	...

	Texture2D whitepixel;

	Rectangle player;
and after that, we need to initialize this variable, because it is currently null:
...
protected override void Initialize()
{
	// Rectangle(x, y, width, height)
	player = new Rectangle(100, 100, 16, 16);

	base.Initialize();
}
...
By the way, do we really need to initialize this variable in the Initialize method? Not necessarily,
you can also initialize it inside of the LoadContent method, if you want, but just for organization purposes,
i decided to initialize it inside of the Initialize method.
The position i have chosen is arbitrary, so you can use any value between 0 to 608 - the width of the snake for the x
axis and 0 to 608 - the height of the snake for the y axis.
Why 608 - the width of the for the X and 608 - the height of the snake for the Y? Because by default when you move
any rectangle or texture, you position it from the top left corner, which means that when you set
X to 0, the left side of the rectangle will be exactly at the left corner of the window, but when you
set the X to 608, then the left side of the rectangle will be aligned with the right corner of the window,
and this will happen:
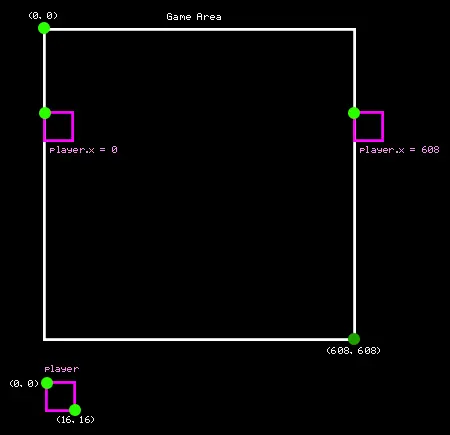
Notice that when we set X to 608 (the width of the screen), as the rectangle is positioned from
its top left corner, the rectangle ends up outside the screen.
But when we set X to 608 and subtract Width from the rectangle, this is the result:
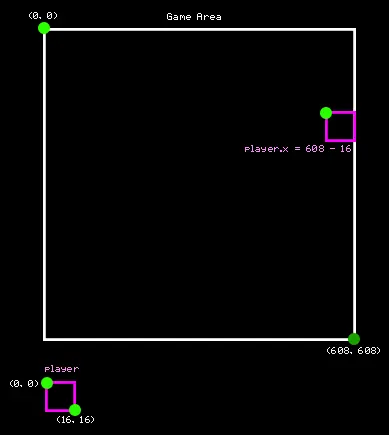
And why did we do that:
public class Game1 : Game
{
	...
	Rectangle player;

	...
	protected override void Initialize()
	{
		// Rectangle(x, y, width, height)
		player = new Rectangle(100, 100, 16, 16);

		base.Initialize();
	}
	...
}
instead:
public class Game1 : Game
{
	...
	int snakeX = 100;
	int snakeY = 100;

	...
	protected override void Draw(GameTime gameTime)
	{
		...
		spriteBatch.Begin();
		spriteBatch.Draw(whitepixel, new Rectangle(snakeX, snakeY, 16, 16), Color.White);
		spriteBatch.End();
		...
	}
}
When you assign a struct from one variable to another, you are creating a whole copy of that structure.
This behavior doesn’t occur with instances of classes.
The problem is that the Draw method is executed several times in one second and the new Rectangle() inside of the Draw method
call are being recreated with each new rendering cycle, that is, many, many times.
And this behavior of recreating the same structure will give you headaches in the long run, specially if the structure is large, which
is the case with a Rectangle.
So instead, we create the Rectangle at the top of our main class and just pass it as a reference and, when we need to change something, we modify the properties of this cached rectangle.
Drawing the Snake Head
Ok, let’s draw the snake’s head in the same way we drew our beautiful rectangle earlier:
...
spriteBatch.Draw(whitepixel, player, Color.White);
...
If we execute the project:
By the way, look at the Color.White value in the Draw method call.
If we change this value, we can change the color of our snake.
Changing Color
Snake Color
If you type Color.| and leave the text cursor after the dot, your code editor should show all the colors
available for use:
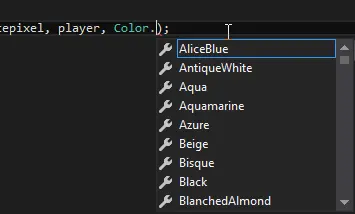
If you accidentally elsewhere and the code suggestions disappear, simply place the text cursor after the dot (
Color.|) and press Ctrl + Space.
I’ll choose the color Yellow:
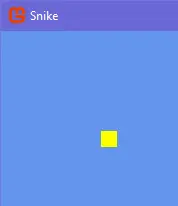
If you want to use a custom color, you’ll need to instantiate the Color struct.
Go to your search engine or your favorite image editor (do you have a favorite image editor?) and look for a Color Picker.
Choose a color and look for the properties R, G and B:
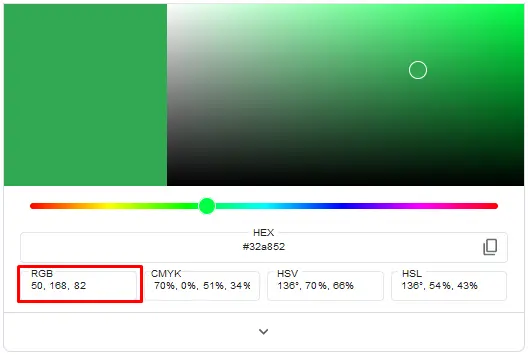
and then do this in your code:
...
spriteBatch.Draw(whitepixel, player, new Color(50, 168, 82));
...
If we execute our project:
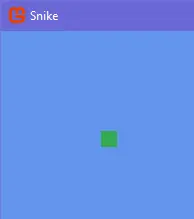
Cool, but it’s a bit hard to see the color green against that blue background…
Shall we change the background color?
Background Color
Did you notice the GraphicsDevice.Clear(Color) statement at the beginning of the Draw method?
...
protected override void Draw(GameTime gameTime)
{
	GraphicsDevice.Clear(Color.CornflowerBlue);
	...
Did you notice that the same struct being used to set the background color here is the same struct we used to define the color of the snake earlier?
We can use a predefined color or a custom color (just like we did with the snake).
I’ll choose a predefined color:
...
GraphicsDevice.Clear(Color.Black);
...
If we execute:
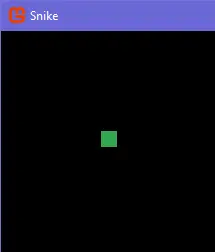
Beautiful, but i’ll keep the snake, white:
...
spriteBatch.Draw(whitepixel, player, Color.White);
...
Moving
Before i start, i’ll position our snake in the center of the screen:
...
protected override void Initialize()
{
	player = new Rectangle(608 / 2, 640 / 2, 16, 16);
...
Well, let’s recap one thing: our snake won’t move like Mario, in a platform game where the player moves while you hold down a button and stops when you release it.
Our snake will move in one direction and, when you press a button, it will only change that direction.
At the top of our main class, we’re going to create two variables that will represent the direction:
...

Rectangle player;
int directionX = 0;
int directionY = 0;

public Game1()
{
...
If you want, you can use a Vector2 to represent the direction:
...

Rectangle player;
Vector2 direction = Vector2.Zero; // equivalent to new Vector2(0f, 0f)

public Game1()
{
...
Getting Keyboard Input
Inside of your Update method, at the top, there is probably already an input statement:

This statement defines that when the user presses Escape on a keyboard or the Back button on a gamepad, the window will be closed.
I’m going to remove that statement, but you can keep it with you want.
We can get keyboard inputs via the static GetState method of the Keyboard class:
...
protected override void Update(GameTime gameTime)
{
	var keyboardState = Keyboard.GetState();

	if (keyboardState.IsKeyDown(Keys.Left) || keyboardState.IsKeyDown(Keys.A))
	{
		// do something
	}
...
Keysis anenumnative to MonoGame.If you see a red underline below the declaration, this means that you need to import the namespace that contains this enum.
At the very top of your class file insert
using Microsoft.Xna.Framework.Input
What the statement above is saying is that if the left button or the letter a on your keyboard is pressed, something should happen.
Very cool, let’s do this:
...
if (keyboardState.IsKeyDown(Keys.Left) || keyboardState.IsKeyDown(Keys.A))
{
	directionX = -1;
}
if (keyboardState.IsKeyDown(Keys.Right) || keyboardState.IsKeyDown(Keys.D))
{
	directionX = 1;
}
if (keyboardState.IsKeyDown(Keys.Up) || keyboardState.IsKeyDown(Keys.W))
{
	directionY = -1;
}
if (keyboardState.IsKeyDown(Keys.Down) || keyboardState.IsKeyDown(Keys.S))
{
	directionY = 1;
}
...
Here we are saying that we want to set a direction according to the key we are pressing.
For example, if we press A we want to set the directionX to -1, which means that the snake
should move to the left.
Understading the Y Axis
If you remember what the coordinates of a Cartesian plane look like, you’re probably noticing something strange here.
Pressing A sets the directionX to -1 and D sets it to 1, which is ok, but… Pressing W sets
the directionY to -1 and S sets it to 1? What is that? Why is up -1 and down +1?
When your monitor image is rendered (yes, the image you’re looking at right now is being rendered over and over again, like a game), it is rendered from top to bottom, similar to what we saw earlier where we talked about positioning, where our rectangle is positioned from its top left corner.
In short, when your monitor image is drawn, it is also drawn from the top left corner and just to match this characteristic the y-axis is inverted in MonoGame (and many other frameworks, such as PhaserJS).
Just keep in mind that, by default, when you want to move something up, you should decrease Y
and when you want to move it down, you should increase Y.
Is it possible to “correct” this behaviour? Perfectly, but if you don’t want to keep multiplying all the values you defined
on the Y axis by -1, you’ll need to use a new Matrix projection and that’s a advanced topic that i don’t intend to cover
just yet, so… don’t worry about it for now.
Moving The Snake
Ok, now, to move our snake, we need to add directionX and directionY to the X and Y of
our snake, respectively (as we did before):
...
if (keyboardState.IsKeyDown(Keys.Down) || keyboardState.IsKeyDown(Keys.S))
{
	directionY = 1;
}

player.X += directionX;
player.Y += directionY;

base.Update(gameTime);
...
Ok, run the project and try pressing any key we’ve defined:

🤔 Something’s wrong, when we press A, the snake move to the left, but when we press W, the snake moves diagonally instead of just upwards… why?
Can you figure out why this behaviour is happening without me having to explain it? 🤭
If not, don’t worry.
The reason for that behaviour is that when we press any key the first time, one direction is set but the other direction remains 0 until we press a key that represents a direction of another axis… does that sound complicated or confusing? Hehe, let me explain it better:
When you start your game, directionX and directionY start as 0, so when you press A for the first time,
without pressing any other key at the same time, you will set directionX to -1, which will move our snake
to the left because of the player.X += directionX instruction, ok.
When you press W, directionY is set to -1 which, likewise, should move our snake upwards because due to
player.Y += directionY, but note that when we set directionY to -1, directionX remains -1,
which means that we are moving the snake to the left and upwards, or in other words, diagonally.
To fix this, when we change the direction, we need to set the direction of the other axis to 0:
...
if (keyboardState.IsKeyDown(Keys.Left) || keyboardState.IsKeyDown(Keys.A))
{
	directionX = -1;
	directionY = 0;
}
if (keyboardState.IsKeyDown(Keys.Right) || keyboardState.IsKeyDown(Keys.D))
{
	directionX = 1;
	directionY = 0;
}
if (keyboardState.IsKeyDown(Keys.Up) || keyboardState.IsKeyDown(Keys.W))
{
	directionX = 0;
	directionY = -1;
}
if (keyboardState.IsKeyDown(Keys.Down) || keyboardState.IsKeyDown(Keys.S))
{
	directionX = 0;
	directionY = 1;
}
...
When we set directionX to 1 or -1, we set directionY to 0.
When we set directionY to 1 or -1, then we set directionX to 0.
If we test it now:

A-mazing, i know 😌
Moving Faster and Aligned
Our snake is moving too slowly, let’s do this:
...
player.X += directionX * 16;
player.Y += directionY * 16;
...
Let’s try again:
Hm… Our snake is faster than we expected, right? 🙄
To fix that, let’s do this:
float accumulator = 0f;
float moveInterval = 0.4f;
protected override void Update(GameTime gameTime)
{
	accumulator += (float)gameTime.ElapsedGameTime.TotalSeconds;

	var keyboardState = Keyboard.GetState();

	// ... .IsKeyDown() statements ...

	if (accumulator >= moveInterval)
	{
		accumulator -= moveInterval;

		player.X += directionX * 16;
		player.Y += directionY * 16;
	}

	base.Update(gameTime);
}
And this is the result:

Very cool, isn’t it?
Why is the snake moving… making little jumps of 16px? That’s a question for you to find out.
What is the code above doing? Well, we can use gameTime.ElapsedGameTime.TotalSeconds as DeltaTime
to properly synchronize anything with= the current frame rate.
Understanding A Bit of DeltaTime (And Learning a Trick)
The gameTime.ElapsedGameTime.TotalSeconds contains the interval in seconds between the previous frame
and the current one, which curiously, when we add this interval to some variable, that variable will
reach 1 in exactly 1 second, i.e.: when this variable is 1, then 1 second has passed,
when it is 2, 2 has passed and so on.
Don’t worry if this concept is completely new to you and seems a bit complicated, you’ll get used to it.
What we’re doing is using this interval to create a kind of alarm:
We are adding the interval to some variable, and when an interval is reached, which means that our alarm has been triggered, we do something, in this case, the snake moves.
Here’s a illustration of how it works:
/*
// Initialization
accumulator = 0
moveInterval = 0.4

-- this is just an arbitrary value, the actual delta range can be greater or less than 0.1
TotalSeconds = 0.1

// Frame 1
accumulator += TotalSeconds -- accumulator = 0.1

is accumulator > moveInterval? False

// Frame 2
accumulator += TotalSeconds -- accumulator = 0.2

is accumulator > moveInterval? False

// Frame 3
...
// Frame 4
...

// Frame 5
accumulator += TotalSeconds -- accumulator = 0.5

is accumulator > moveInterval? True, then, move the snake

accumulator -= moveInterval -- acumulator = 0.1

repeat again and again.
*/
Note that when the alarm is triggered, we don’t restart it by setting the accumulator to 0, but by subtracting the moveInterval.
We do this because we don’t know what the value of TotalSeconds will be in the next frame, so it’s more appropriate to just
subtract the moveInterval and keep the remaining TotalSeconds, which should ensure better synchronization with the game’s framerate.
By the way, keep this trick on your gamedev diary because you can also use it in various other circumstances such as animating sprites.
Making Our Snake a Bit More Faster
To do this, simply decrease the interval to move the snake in our pseudo-alarm, but instead of changing 0.4 to another small value, we can simply divide this value by any other value:
...
float moveInterval = 0.4f / 3f;
protected override void Update(GameTime gameTime)
{
...
And the bigger the divider, the smaller the interval and the faster the snake will move:

Drawing A Dividing Line
Let’s draw a dividing line between the bottom edge of the scoring place and the top edge of the snake area.
If you move your snake upwards, you’ll see that it can move until it leave the confines of the screen.
But, as i said earlier: the area in which our snake can move is 608x608px and, although we will limit the snake’s area in the code, will be very useful during the game to show the player how far it can move.
To draw a line, we can use the same strategy we used to draw the snake’s rectangle, but before we do that, we’ll create
a Rectangle variable at the top of our main class (to avoid recreating it every rendering cycle) and initilize it:
public class Game1 : Game
{
	...
	Rectangle topBorder;
	...
	protected override void Initialize()
	{
		...
		topBorder = new Rectangle(0, 32, 608, 1);

		base.Initialize();
	}
	...
}
...
and then we’ll draw that line:
...
protected override void Draw(GameTime gameTime)
{
	...
	spriteBatch.Begin();
	...
	spriteBatch.Draw(whitepixel, topBorder, Color.White);
	spriteBatch.End();
	...
}
Note that we are drawing this line at the end of the spriteBatch (before the .End call), this is to avoid the snake being drawn
in front of the line… that will make more sense later.
By the way, take a short break and try to figure out for yourself what the values we use in the line rectangle declaration represent.
Let’s test the project:
Creating the Fruit
Let’s create a new Rectangle to represent our fruit:
...
Rectangle fruit;
...
We need to initialize it:
protected override void Initialize()
{
	...
	fruit = new Rectangle(100, 100, 16, 16);
	...
And now let’s draw our fruit as if it were an apple:
...
spriteBatch.Draw(whitepixel, player, Color.White);

spriteBatch.Draw(whitepixel, fruit, Color.Red);
...
If we test:
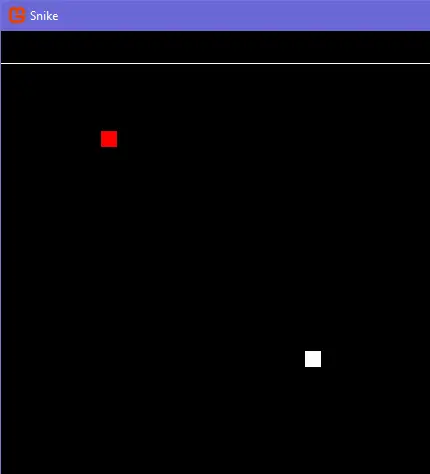
Really beautiful.
Did you notice that the instruction that draws the fruit is after the instruction that draws the player?
The default drawing order is from back to front; for example, according to the order which we write our statements, the player will be drawn first and then the fruit in front of him.
Wanna see?
Exactly as i said.
If we change the order:
...
spriteBatch.Draw(whitepixel, fruit, Color.Red); // draw the fruit first

spriteBatch.Draw(whitepixel, player, Color.White); // draw the player later
...
that will be the result:
Ok, almost perfect… almost because the fruit is misaligned and that bothers me 😫
Well, the reason is that we put our fruit in the position x = 100 and y = 100 and 100 is not
a multiple of 16.
Let’s go back to the Initialize method and set the position to 16 * 6 (or 16 times any other value):
protected override void Initialize()
{
	...
	fruit = new Rectangle(16 * 6, 16 * 6, 16, 16);
	...
if we test now:
Eating the Fruit
Let’s go now move to a canonical event in our jorney: making the snake eat the fruit.
In the the Update method, do the following:
...
if (accumulator >= moveInterval)
{
	...
}

if (player.Intersects(fruit))
{
	fruit.X = 16 * 20;
	fruit.Y = 16 * 13;
}

base.Update(gameTime);
...
What is the .Intersects() method? This method checks if two Rectangle are overlapping.
When the Rectangle of the snake is on top of the Rectangle of the fruit, they are overlapping.
trueis returned when two rectangles are overlapping andfalseotherwise.
Ok, there are two problems:
-
When the fruit is eaten, it goes to another place, but that place never changes again when we try to eat it again.
-
The snake doesn’t grow.
To solve the first one, let’s do one thing: do you remember that a Rectangle has many useful properties,
such as Left or Top and Width or Height?
We’ll create a large rectangle that will cover the area in which our snake can move and we’ll use it as a reference to position the fruit more easily.
We’re not going to draw this rectangle, we just need it to make it easier to position our fruit, i.e. just as a reference:
...
Rectangle levelArea;
...
...
protected override void Initialize()
{
	...
	levelArea = new Rectangle(0, 32, 608, 608);
	...
}
...
If you want to draw this rectangle just to see where it are and how big it is, feel free.
Ok, now let’s update the code so that the position of the fruit is always changed when the snake eats it:
...
if (player.Intersects(fruit))
{
	int minX = levelArea.Left / 16;
	int maxX = levelArea.Right / 16;
	int minY = levelArea.Top / 16;
	int maxY = levelArea.Bottom / 16;

	fruit.X = 0;
	fruit.Y = 0;
}
...
What are we doing here? well… you’ll see, go back to the top of our main class and create a new variable:
...
Random random;
...
The Random class has a method that we’re going to use to generate a new random position for our fruit.
But maybe you’re seeing that problem:

This mean that we’re trying to use a class that doesn’t exist in the current context, so we need to import this namespace.
You can import this namespace in two ways:
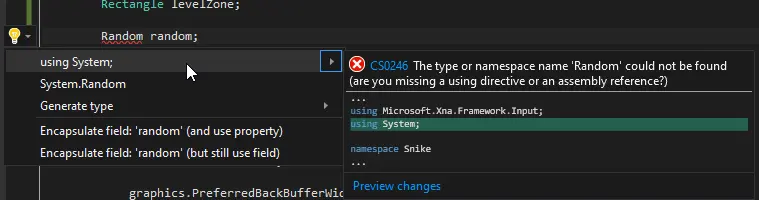
- Hold your cursor over the name
Randomand when a pop-up appears, click on Show potential fixes
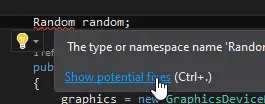
and then click on using System;:
You can also do the same as you did to see the colors available in
Changing Colortopic. Place your text cursor on the right-hand side of the class name (Random|) and press CTRL + . (dot) and do the same thing as above.
- Import directly
Go to the very top of your main class file and type using System;:
...
using Microsoft.Xna.Framework.Input;

using System;

namespace Snike {
and after doing one of the two ways mentioned above, you need to initialize this property:
...
protected override void Initialize()
{
	...
	random = new Random();

	base.Initialize();
}
...
Now, back to the Update method:
if (player.Intersects(fruit))
{
	int minX = levelArea.Left / 16;
	int maxX = levelArea.Right / 16;
	int minY = levelArea.Top / 16;
	int maxY = levelArea.Bottom / 16;

	fruit.X = random.Next(minX, maxX) * 16;
	fruit.Y = random.Next(minY, maxY) * 16;
}
If we test:
The .Next() method returns a pseudo-random integer between a min value and a max value.
For example, random.Next(1, 10) will return a pseudo-random integer between 1 and 10.
What are all these magic values? My dear, that’s simple math, try to figure it out 😉
Programming is a ocean of logic and mathematics is perfect for training this skill, specially in game development.
Growing the Snake
I think you’ve seen that no matter how much this snake eats, it’s still malnourished 😅
Let’s change that.
What we need to do is: every time we eat a fruit, we need to create a new rectangle and place it on our snake’s tail.
We need some kind of data structure to store these rectangles:
...
List<Rectangle> snakeBody;

public Game1()
...
The List class is a data structure that allows us to store and remove items dynamically from it
and <Rectangle> means that this list will only accept Rectangles.
Maybe you’re having a similar problem to the one we had when we tried to use the Random class, saying that
you need to import some namespace, so, import it via the show potential fixes pop-up or by inserting
the using System.Collections.Generic; directive directly at the top of the main class file.
After that, you need to initialize this structure, do this in the Initialize method:
...
protected override void Initialize()
{
	...
	snakeBody = new List<Rectangle>();
	...
}
...
Ok, inside the code that repositions the fruit when the snake eats it, let’s do this:
...
 if (player.Intersects(fruit))
{
	// position the fruit to a pseudo-random location
	...

	// grow the snake
	snakeBody.Add(player);

	...
}
...
We will simply add to the player’s Rectangle to the snakeBody list and this will create an exact copy
of that Rectangle and store it in the list.
Struct vs. Class
As i said in the topic creating a rectangle and understanding positioning, unlike classes, structures are completely copied when you assign a variable containing one structure to another, for example:
Struct:
struct Character
{
	public string Name;
	public Character(string name)
	{
		this.Name = name;
	}
}

Character A = new Character("Daisy");
Character B = A;

B.Name = "Toadette";

Console.WriteLine(A.Name); // => output: Daisy
Console.WriteLine(B.Name); // => output: Toadette
Class:
class Character
{
	public string Name;
	public Character(string name)
	{
		this.Name = name;
	}
}

Character A = new Character("Daisy");
Character B = A;

B.Name = "Toadette";

Console.WriteLine(A.Name); // => output: Toadette
Console.WriteLine(B.Name); // => output: Toadette
Did you noticed that, in the class, when we change the Name property of the B variable, we also change
the value of Name in the A variable? And this behavior doesn’t occur with a struct?
This is a behavior you need to keep in mind because you may run into problems when trying to modify the properties of structures.
In short:
-
By assigning a variable that contains a Structure to another, you will create an entire copy of that same structure for the other variable.
-
When you assign a variable that contains an instance of a class to another, you just create a new reference to the same instance and, consequently, when you change something in a reference, that change will affects all other variables that also reference that instance.
And the fact that assigning a variable that contains a struct to another creates an entire copy
of the same structure is what makes snakeBody.Add(player) works.
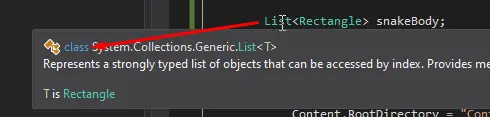
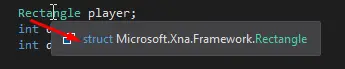
By the way, a simply way to know if the data you’re using is a class or a struct is to place your cursor
over the name of the data type and wait:
Drawing the Snake Body
Drawing the snake’s body is very simple; in fact, we only need to iterate through the data structure that contains all the parts of the snake’s body:
...
protected override void Draw(GameTime gameTime)
{
	...

	spriteBatch.Draw(whitepixel, player, Color.White);

	for (int i = 0; i < snakeBody.Count; i++)
	{
		spriteBatch.Draw(whitepixel, snakeBody[i], Color.White);
	}

	...
}
Let’s test this:
Hum… cool, as we (or just me 🤭) was expecting: the rectangles that make up the snake’s body are being created, but… that’s all.
Now we need to update the position of each part of the snake’s body to follow the snake’s head.
But before that, lets rename the player rectangle to snakeHead, because what we’re controlling
is actually the head of our snake.
But if we rename the property at the top of our main class, we’ll also need to rename it in all the places where we’ve already used that name and that’s a chore.
To rename the variable in all the places that already have this name at once, we can do one thing:
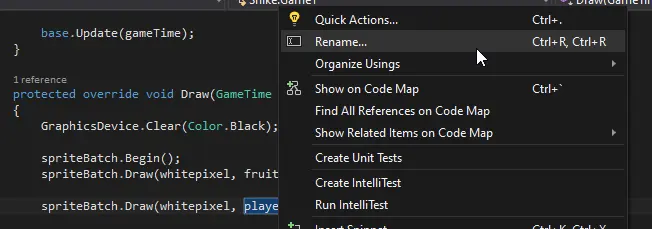
Visual Studio
Just go to any reference of the player variable, place the cursor on it, right-click and click Rename…:
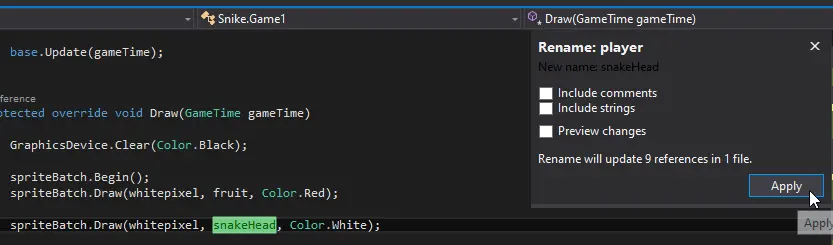
Then type snakeHead and click Apply (or press Enter):
Visual Studio Code
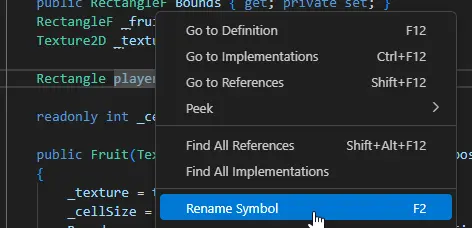
Right-click on the name of the variable anywhere it is used and click on Rename Symbol:
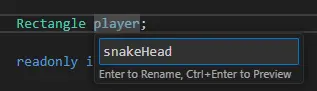
type snakeHead and press Enter:
Finally, you’ve just renamed the variable player variable to snakeHead everywhere at once.
Moving the snake body
This is how we’ll update the position of the snake’s body: we’ll start with the last part of the snake’s tail and set its position to the position of the part before it.
However, we have a problem: the first rectangle in the snakeBody list is stopped, which means that
all the parts of the snake will be positioned in the same place, because the only part that actually
moves is the snakeHead and that Rectangle is outside this list, so we need to
add the snake’s head to this list:
...
protected void Initialize()
{
	...
	snakeBody = new List<Rectangle>();
	snakeBody.Add(snakeHead);

	base.Initialize();
}
...
But doing this doesn’t solve the problem, because the snakeHead variable is a different
structure from the snakeHead we just added to the snakeBody list.
We will need to make some updates to the Update method:
// before
snakeHead.X += directionX * 16;
snakeHead.Y += directionY * 16;

// later
var snakeHead = snakeBody[0];
snakeHead.X += directionX * 16;
snakeHead.Y += directionY * 16;
snakeBody[0] = snakeHead;
Why are we doing this:
var snakeHead = snakeBody[0];
snakeHead.X += directionX * 16;
snakeHead.Y += directionY * 16;
snakeBody[0] = snakeHead;
instead:
snakeBody[0].X += directionX * 16;
snakeBody[0].Y += directionY * 16;
This is because you can’t modify any property of any struct directly from a data structure,
you can only replace the structure in that position with another structure, so we need to put it in a variable
snakeHead = snakeBody[0] (creates a copy), updates its properties and then replace the structure in the same
position in the list with the one we just modified snakeBody[0] = snakeHead.
If Rectangle were a class, we could modify it directly from the list, but since it isn’t, we can’t
(sorry, i didn’t make the rules 🤷♂️)
Okay, also remove the instruction we were using to draw just the snake’s head, because as we’ve added
snakeHead to the snakeBody list and we’re already drawing all parts of that list, the
snake’s head will already be drawn too.
We also need to update the reference in the instruction to eat the fruit:
// before
if (snakeHead.Intersects(fruit))
{
	...

// later
if (snakeBody[0].Intersects(fruit))
{
	...
If you test your project now, it should work exactly as before.
Ok, a just above of the code we’re using to move the snake’s head, let’s do this:
...
accumulator -= moveInterval;

// move snake tail
if (snakeBody.Count > 1)
{
	for (int i = snakeBody.Count - 1; i > 0; i--)
	{
		var currentSnakePiece = snakeBody[i];
		currentSnakePiece.X = snakeBody[i - 1].X;
		currentSnakePiece.Y = snakeBody[i - 1].Y;
		snakeBody[i] = currentSnakePiece;
	}
}

var snakeHead = snakeBody[0];
...
Let’s test:
In the code above we’re doing exactly what i said: we’re making the last part of the snake’s tail follow the previous part.
Try to understand for yourself how this works.
Ok, have you noticed anything? Whenever we eat fruit we see a small square in the center of the screen and then it disappears? what is that?
Well, here’s the problem:
if (snakeBody[0].Intersects(fruit))
{
	...

	// grow the snake
	snakeBody.Add(snakeHead);
}
As you can see, we are adding the snakeHead reference to the list.
The problem is that we are updating the snakeHead which is inside of the snakeBody list and,
as you know, these two structures are completely different.
But the other reason we’re seeing that little square in the center of the screen is that the code that checks when the fruit has been eaten is outside the code that updates the snake’s position.
The problem is that the snake’s head only moves after a short interval, but the code that checks when the fruit is eaten is being executed every frame, which is unnecessary.
Let’s move all this code into the code that moves the snake:
...
if (accumulator >= moveInterval)
{
	...
	snakeBody[0] = snakeHead;

	// eat fruit
	if (snakeBody[0].Intersects(fruit))
	{
		// position the fruit to a pseudo-random location
		int minX = levelArea.Left / 16;
		int maxX = levelArea.Right / 16;
		int minY = levelArea.Top / 16;
		int maxY = levelArea.Bottom / 16;

		fruit.X = random.Next(minX, maxX) * 16;
		fruit.Y = random.Next(minY, maxY) * 16;

		// grow the snake
		snakeBody.Add(snakeHead);
	}
}
...
Now, checking when the snake eats the fruit will only be carried out when the snake actually moves.
Just by doing this we don’t need to update the snakeBody.Add(snakeHead) reference:
Ok, our game are almost complete, we need just more 3 things:
- Game over when hiting walls
- Game over when hiting itself
- Scoring
Game Over
When Hiting a Wall
Let’s create a variable called isGameOver that will determine whether you can play or not.
...
bool isGameOver = false;

public Game1()
{
Note i’ve already initialized this variable as false.
If you want, you can do this in the Initialize method.
Within the Update method, do the following:
...
protected override void Update(GameTime gameTime)
{
	if (isGameOver != true)
	{
		accumulator += (float)gameTime.ElapsedGameTime.TotalSeconds;

		// ... keyboard code ...

		if (accumulator >= moveInterval)
		{
			// ... movement, growth and fruit code ...
		}
	}

	base.Update(gameTime);
}
...
Now do a test, go to the declaration of the isGameOver variable and set it to true and then try to play.
If you’ve done everything right, you shouldn’t be able to move.
Ok, what we’ll do is very simple: if the snake’s head hits a wall, we’ll set that variable to true:
inside the Update method:
...
 // move snake head
var snakeHead = snakeBody[0];
...

if (snakeHead.Left <= levelZone.Left || snakeHead.Top <= levelZone.Top ||
	snakeHead.Right >= levelZone.Right || snakeHead.Bottom >= levelZone.Bottom)
{
	isGameOver = true;
}

// eat fruit
if (snakeBody[0].Intersects(fruit))
{
...
Now, test your game:
When Hiting Itself
Just below the code where we write the gameover instructions when hiting a wall, write this:
...
// gameover when colliding with itself
for (int i = 1; i < snakeBody.Count; i++)
{
	if (snakeHead.Intersects(snakeBody[i]))
	{
		isGameOver = true;
		break;
	}
}

// eat fruit
if (snakeBody[0].Intersects(fruit))
...
What we’re doing is checking whether the snake’s head is overlapping any part of the snake’s body, if it is,
we set isGameOver to true.
Note that we start the for loop from 1 instead of 0.
If we start at 0, the snake’s head will collide with itself and you’ll lose immediately.
Let’s test?
Very cool, now we need a way to restart the game.
Reseting
This is how it will works: when the player loses, him will need to press Enter to restart.
Let’s move the keyboardState variable out of the if (isGameOver != true) statement, because
when the player loses, we need to capture the pressing of the Enter key.
...
protected override void Update(GameTime gameTime)
{
	var keyboardState = Keyboard.GetState();

	if (isGameOver != true)
	{
		accumulator += (float)gameTime.ElapsedGameTime.TotalSeconds;

		if (keyboardState.IsKeyDown(Keys.Left) ||
			keyboardState.IsKeyDown(Keys.A))
			...
	...
...
And at the end of the Update method:
...
	// reset the game
	if (isGameOver == true && keyboardState.IsKeyDown(Keys.Enter))
	{
		snakeBody.Clear();
		snakeBody.Add(snakeHead);
		directionX = 0;
		directionY = 0;
		isGameOver = false;
	}

	base.Update(gameTime);
}
...
We need the keyboardState outside the snake-related code because all the code inside it is only
executed if isGameOver is false, but when you lose, that variable is set to true, so we wouldn’t have
access to that variable to get input from the keyboard.
.Clear() clears the snakeBody list and then we add the snakeHead again (perhaps by now you
no longer remember that we still have this rectangle, and this rectangle is are already positioned in the
center).
Setting directionX and directionY to 0 ensure we don’t start the game in motion.
Cool, but there’s one thing that bothers me… every time you restart the game, the fruit stays in the same position.
We could solve this by copying the code that randomly positions the fruit and pasting it into instructions that restart the game when we press enter, but this is unnecessary because we would be repeting the code and, if for some reason we need to update something in this code, we would have to update two places.
Instead, let’s turn this code into a function:
Anywhere inside the main class, create a new method:
...
private void PutFruitInARandomPosition()
{
	// code that randomly positions the fruit
}
...
Now move all the code that repositions the fruit into this method:
...
private void PutFruitInARandomPosition()
{
	// positions the fruit to a pseudo-random location
	int minX = levelZone.Left / 16;
	int maxX = levelZone.Right / 16;
	int minY = levelZone.Top / 16;
	int maxY = levelZone.Bottom / 16;

	fruit.X = random.Next(minX, maxX) * 16;
	fruit.Y = random.Next(minY, maxY) * 16;
}
...
and inside the Update method, in the same place where we were repositioning the fruit,
we will call this method:
...
 // eat fruit
if (snakeBody[0].Intersects(fruit))
{
	PutFruitInARandomPosition();

	// grow the snake
	snakeBody.Add(snakeHead);
}
...
And finally, we’ll call this method again within the code that restarts the game:
...
if (isGameOver == true && keyboardState.IsKeyDown(Keys.Enter))
{
	...
	PutFruitInARandomPosition();
}
...
let’s test:
Beautiful 😚🤏
Scoring
Now for the final stage.
To write something on the screen, we need a font, so we need to import one.
Open the mgcb-editor (the content pipeline), rick-click on Content, go to Add and click on
New Item…:
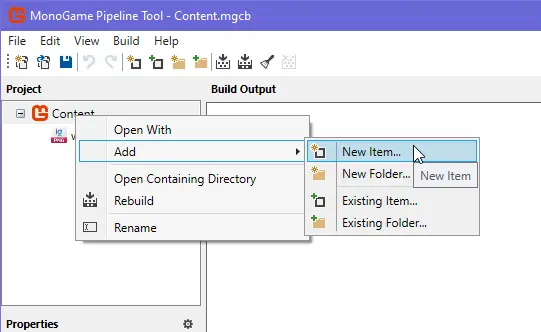
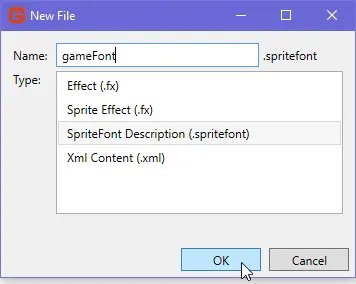
In the small window that will appear, select SpriteFont Description (.spritefont), give it any name and press OK:
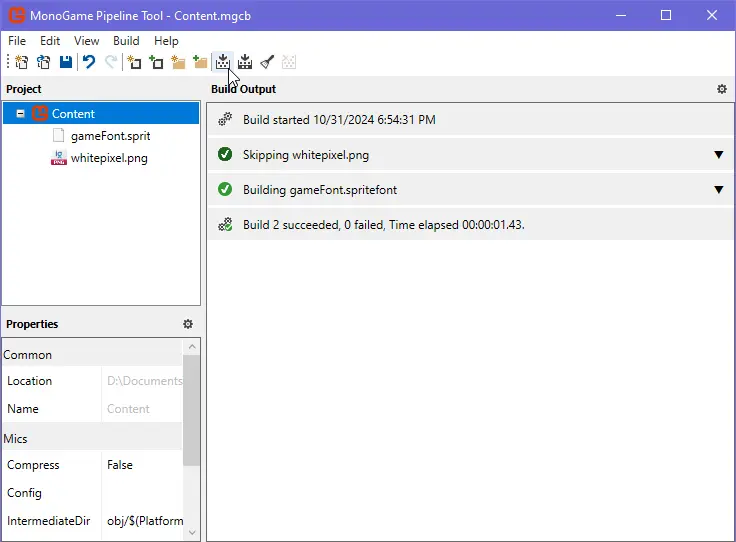
and finally click on Build:
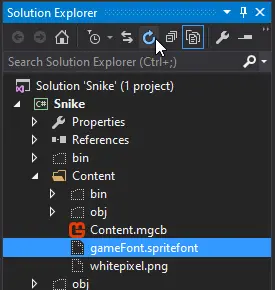
If you look inside the Content directory you should see the file gameSprite.spritefont (or any_name_you_give.spritefont)
If not, check that the button Show All Files is enabled and click on the following icon to refresh the explorer:
If you double-click on this file, you can see some informations about the font, such as size, typography, spacing and more.
I’ll keep it the way it is.
Create a SpriteFont variable:
...
SpriteFont gameFont;
...
and then load the font into the LoadContent method:
...
protected override void LoadContent()
{
	...
	gameFont = Content.Load<SpriteFont>("gameFont");
	...
}
...
Now let’s write a text inside the Draw method:
...
protected override void Draw(GameTime gameTime)
{
...
spriteBatch.Draw(whitepixel, topBorder, Color.White);
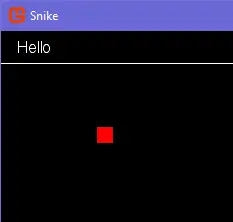
spriteBatch.DrawString(gameFont, "Hello", new Vector2(16f, 8f), Color.White);
spriteBatch.End();
...
}
...
DrawString is the method you will call when you want to draw any text (or string).
If you test the game, you should see a nice “Hello” in the top left-hand corner of the game window:
Ok, now let’s actually set up the score counter.
Create a variable at the top of the main class:
...
int score = 0;
...
And let’s draw this variable:
...
spriteBatch.DrawString(gameFont, string.Format("Score: {0}", score), new Vector2(16f, 8f), Color.White);
...
Basically, the string.Format method formats a string by replacing placeholders and returns a string as result.
{0} is a placeholder that will be replaced by the value of the score variable.
If you only want to draw the score:
...
spriteBatch.DrawString(gameFont, score.ToString(), new Vector2(16f, 8f), Color.White);
...
.ToString() will turn the value into a string:
Ok, now we need to increase that score by eating the fruit.
Within the code that we eat the fruit, do this:
...
// eat fruit
if (snakeBody[0].Intersects(fruit))
{
	...

	// grow the snake
	snakeBody.Add(snakeHead);

	score += 1;
}
...
Now:
Ok, and just like the fruit when you restart the game, the score isn’t being reset.
To fix this, simply set it to 0 when restarting the game:
...
 // reset the game
if (isGameOver == true && keyboardState.IsKeyDown(Keys.Enter))
{
	...
	score = 0;
}
...
Finally:

Challenge and Problem
Problem
When you try to move close to any wall, it causes a game over, try to fix this.
Challenge
Every 5 fruits eaten, increase the snake’s speed to make the game harder.
End
I’m very grateful that you’ve had the patience to get this far.
I’ll soon be bringing you other guides on how to develop more complex games, this is just the beginning.
Thank you very much for having you here, if you have any suggestions, let me know at @lyiar.bsky.social (Bluesky) or @lyiar_u (Xwitter)