How To Create a Pong Game - Part 5
Part 5 | Creating the UI and Managing a Menu
Hi 👋
If you’ve just stumbled upon this and are unsure what’s going on, this chapter is a larger series on How To Create a Pong Game from scratch with MonoGame.
You can read the previous chapter by clicking here.
Our game is almost complete, we only need to:
- Display the score on the screen
- Create a sime menu
- Add a background (optional, to be covered in another chapter)
Importing the Font
In the snake game guide, we used the default Arial font to display the score. In this guide, we’ll take it a step further by using a custom font.
I will use the Pixelmix font, but feel free to choose any font you prefer.
To add the font to your project:
- Open the mgcb editor.
- Navigate to the Content folder.
- Instead of adding an existing item, you need to add a new item.
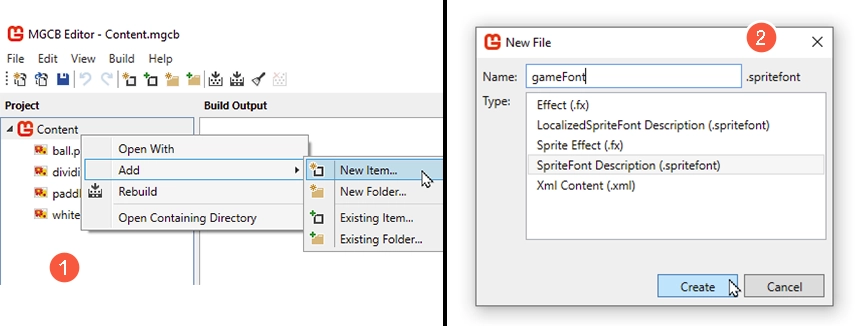
Make sure to select SpriteFont Description (.spritefont) from the list of available Types.
After selecting it, click Build to compile the content, and then close the content pipeline (mgcb editor).
Next, download the Pixelmix font, extract it, and move (or copy) the pixelmix font file to the Content folder at the same level as the spritefont we just created:
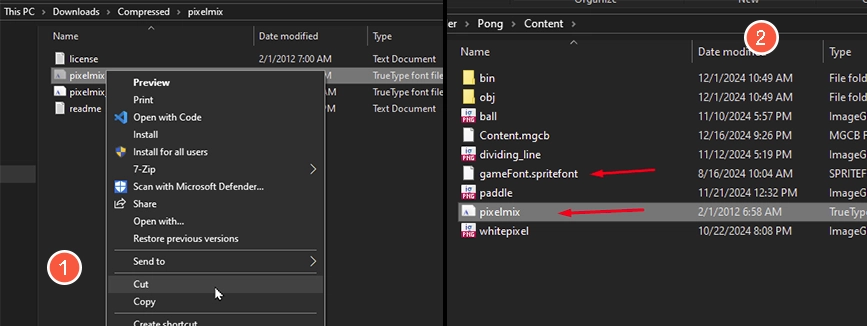
Note: Add the font file directly to the folder without using the mgcb editor. Doing otherwise will result in an error.
Now, open the .spritefont file we created, locate the <FontName> tag and replace Arial with the name of your font file:

Creating the UI class
Create a new class file called UI, and add the following structure:
public class UI
{
    private Game1 game;
    private SpriteFont font;

    public UI(Game1 game, SpriteFont font)
    {
        this.game = game;
        this.font = font;
    }

    public void Draw(SpriteBatch sb)
    {

    }
}
Ensure that the game attribute is declared as Game1 instead of Game, as we’ll need access
to some properties specific of the Game1 class.
Finally, instantiate the class in the main class:
public class Game1 : Game
{
    ...

    private UI ui;

    ...

    protected override void LoadContent()
    {
        ...

        SpriteFont gameFont = Content.Load<SpriteFont>("gameFont");
        ui = new UI(this, gameFont);
    }

    ...

    protected override void Draw(GameTime gameTime)
    {
        ...
        ui.Draw(_spriteBatch);
        _spriteBatch.End();
        ...
    }
}
Call the ui.Draw after all other draw calls, but before SpriteBatch.End.
Drawing the Score
Now within the main class, define two attributes to store the scores:
public class Game1 : Game
{
    public int CPUScore;
    public int PlayerScore;
    ...
}
Now inside the UI class, we can render these attributes:
public class UI
{
    ...
    private Vector2 screenCenter;
    public UI(...)
    {
        ...

        screenCenter = game.ScreenSize / 2f;
    }
    public void Draw(SpriteBatch sb)
    {
       sb.DrawString(font, game.CPUScore.ToString(),
            new Vector2(screenCenter.X + 20f, 10f), Color.White, 0f, Vector2.Zero, 2f,
            SpriteEffects.None, 0f);

       sb.DrawString(font, game.PlayerScore.ToString(),
            new Vector2(screenCenter.X - 20f, 10f), Color.White, 0f, Vector2.Zero, 2f,
            SpriteEffects.None, 0f);
    }
}
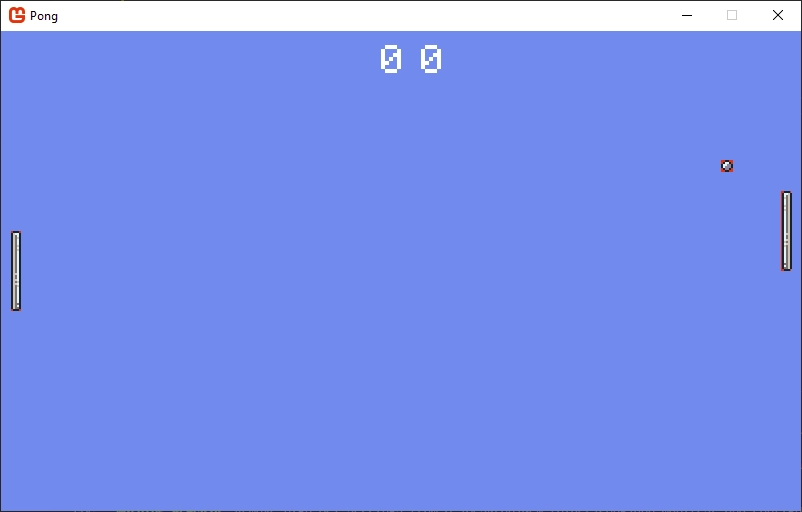
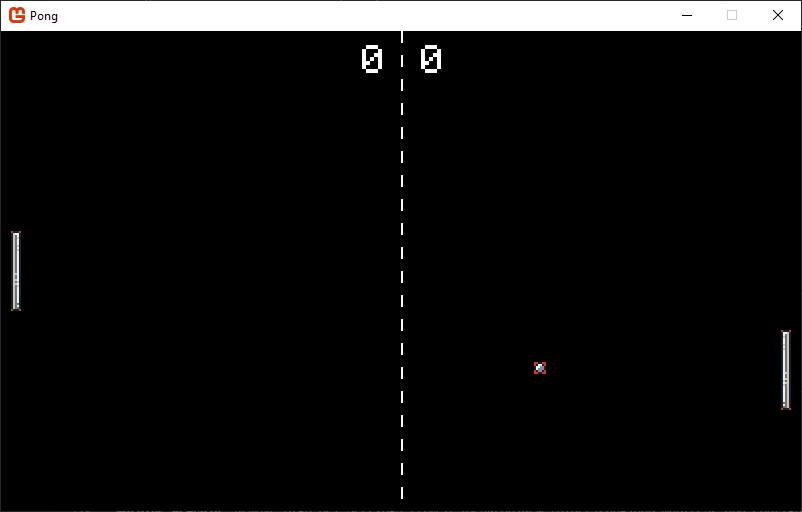
Ok, our score is being displayed.
Now, navigate to the GraphicsDevice.Clear call inside the Draw method in the main class,
and change its color to Color.Black.
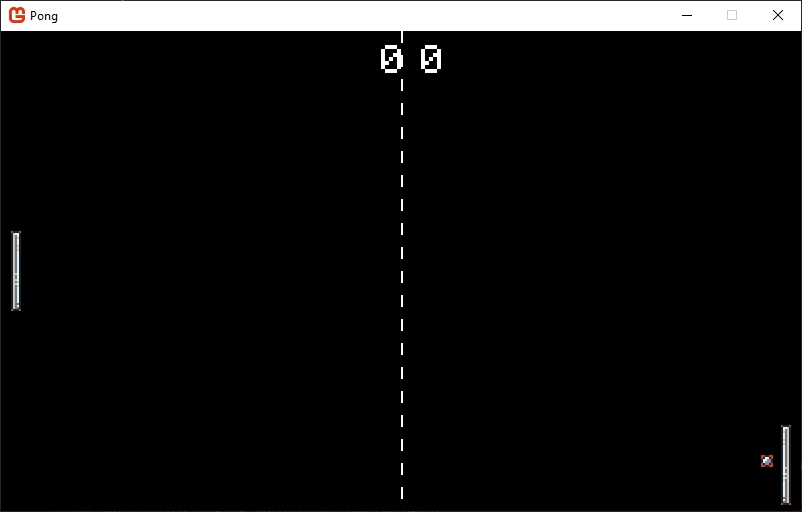
Drawing a Dividing Line
Let’s draw a dividing line in the middle of the screen.
I will use this sprite:

Create a new class called DividingLine (or any other name you prefer) and add the following code:
public class DividingLine
{
    private Texture2D texture;
    private int amountOfDashes;
    private float scale;
    private Vector2 position;
    public DividingLine(Texture2D texture, Vector2 position, float scale)
    {
        this.texture = texture;
        this.position = position;
        this.scale = scale;
        amountOfDashes = 20;
    }
    public void Draw(SpriteBatch sb)
    {
        for (int i = 0; i < amountOfDashes; i++)
        {
            sb.Draw(texture,
                new Vector2(position.X, position.Y + texture.Height * scale * i),
                null, Color.White, 0f, Vector2.Zero, scale, SpriteEffects.None, 0f);
        }
    }
}
And in the main class:
public class Game1 : Game
{
    ...
    private DividingLine dividingLine;
    ...

    protected override void LoadContent()
    {
        ...

        Texture2D dividingLineTex = Content.Load<Texture2D>("dividing_line");
        dividingLine = new DividingLine(dividingLineTex,
            new Vector2(ScreenSize.X / 2f, 0f), scale);
    }
    ...
    protected override void Draw(GameTime gameTime)
    {
        GraphicsDevice.Clear(Color.Black);
        ...

        _spriteBatch.Begin(samplerState: SamplerState.PointClamp);
        dividingLine.Draw(_spriteBatch);
        ...
    }
}
Optimizing
Since the pattern used to create the dividing line remains the same, there’s no need to
iterate inside the DividingLine.Draw method every frame.
So, how we can optimze this? By using a RenderTarget2D.
With this MonoGame feature, we can draw the dividing line once and then use it as a texture.
Let me show you how:
public class DividingLine
{
    ...
    private RenderTarget2D renderTarget;

    public DividingLine(..., Game game, SpriteBatch sb)
    {
        ...

        // creating our texture
        renderTarget = new RenderTarget2D(game.GraphicsDevice, (int)scale,
            (int)(texture.Height * scale * amountOfDashes));

        game.GraphicsDevice.SetRenderTarget(renderTarget);
        sb.Begin(samplerState: SamplerState.PointClamp);
        for (int i = 0; i < amountOfDashes; i++)
        {
            sb.Draw(texture,
                new Vector2(0f, 0f + texture.Height * scale * i), null, Color.White,
                0f, Vector2.Zero, scale, SpriteEffects.None, 0f);
        }
        sb.End();
        game.GraphicsDevice.SetRenderTarget(null);
    }
    public void Draw(SpriteBatch sb)
    {
        sb.Draw(renderTarget, position, Color.White);
    }
}
-
RenderTarget2D(GraphicsDevice, width, height):- Since the width of the sprite is only one pixel, and when we multiply it by the scale
(which is 2), it becomes two, I passed the scale directly to the
widthparameter. - Notice that i also defined the height to match the final height when all lines are drawn.
If you use any size smaller than that, your image will be clipped within the
RenderTarget.
- Since the width of the sprite is only one pixel, and when we multiply it by the scale
(which is 2), it becomes two, I passed the scale directly to the
-
GraphicsDevice.SetRenderTarget(RenderTarget2D)andSetRenderTarget(null):- Notice that I draw our texture between these two statements.
- The first one tells MonoGame to switch from the current draw buffer to our
RenderTarget.- From this point on, everything drawn will be rendered inside the
RenderTarget.
- From this point on, everything drawn will be rendered inside the
- The last statement tells MonoGame to switch back to the default draw buffer.
- Between these two statements, I called the
SpriteBatch.BeginandEndjust as we normally do.
-
Finally, we pass our
RenderTargetdirectly tosb.Draw.- This is possible because
RenderTarget2Dis a subclass ofTexture2D, then we can use it like a common texture.
- This is possible because
If you test your game now, you should see the same result as before, but without the need to run the same loop on every frame.
By the way, in addition to being useful for “pre-caching” texture patterns,
RenderTarget2Dcan also help you fix the draw scale and position according to various screen/window resolutions.
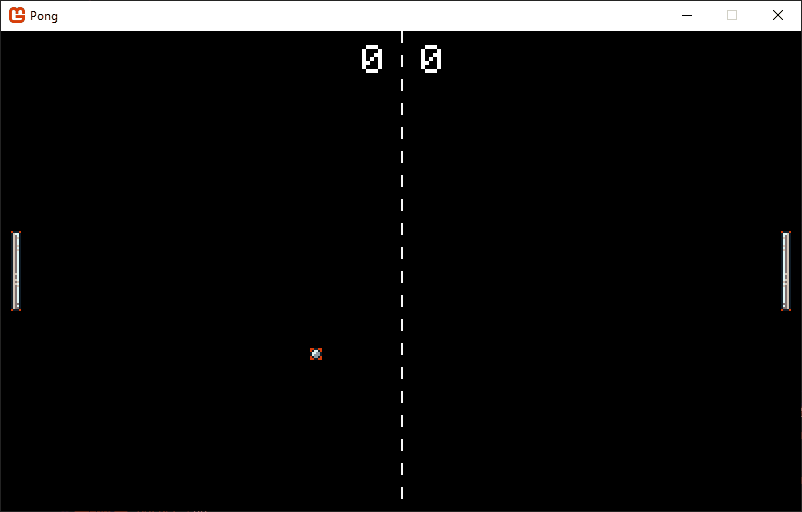
Aligning the Score Text
You’ve probably have noticed that the player’s score is misaligned.
To fix this, we can set the origin of the text to the end of drawn string:
public void Draw(SpriteBatch sb)
{
    ...

    Vector2 stringSize = font.MeasureString(game.PlayerScore.ToString());
    sb.DrawString(font, game.PlayerScore.ToString(),
        new Vector2(screenCenter.X - 15f, 10f), Color.White, 0f,
        new Vector2(stringSize.X, 0f), 2f, SpriteEffects.None, 0f);
}
The SpriteFont provides the MeasureString method, which we can use to get the size of
the current string.
I did it this way because the size of the string will change as the player scores more points.
After getting the size of the string, I set the X origin to the end of the string.
I also moved the string slightly to the left, just to make it look better.
And this is the result:
Increasing the Score
Okay, now we need a way to increase the score.
Inside the main class, let’s add three new methods:
public void IncPlayerScore()
{
    PlayerScore++;
}
public void IncCPUScore()
{
    CPUScore++;
}
public void ResetScore()
{
    PlayerScore = 0;
    CPUScore = 0;
}
Now we need to pass a reference of the main class to the ball and call each method (except for ResetScore):
public class Ball
{
    ...
    public void Update()
    {
        ...

        if (Bounds.Right < 0f)
            game.IncCPUScore();
        if (Bounds.Left > screenSize.X)
            game.IncPlayerScore();

        if (Bounds.Right < -1f || Bounds.Left > screenSize.X)
        {
            Reset();
        }

        ...
    }
    ...
}
Notice that I called both IncCPUScore and IncPlayerScore before Reset.
If Reset is called before these two methods, the ball’s position will be reset before the score is computed.
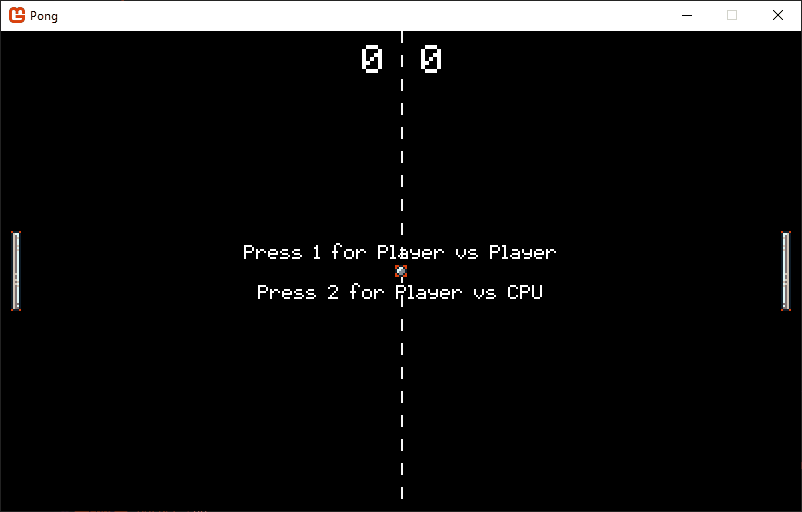
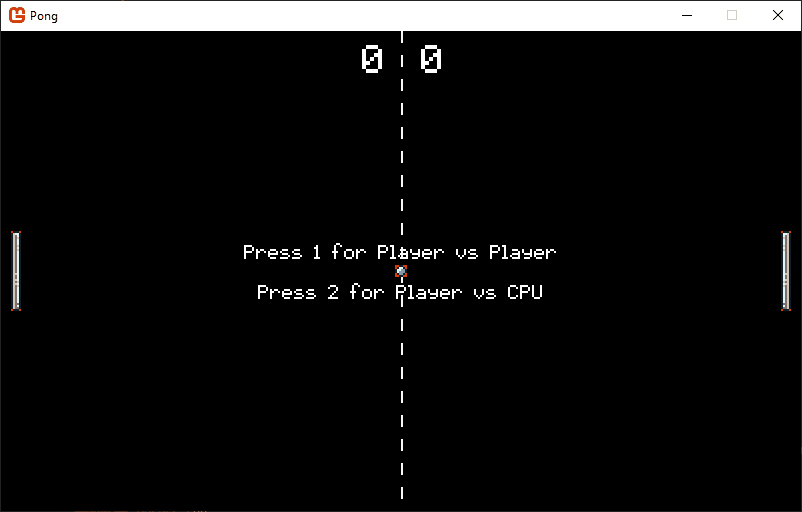
Here’s what we’ll do:
We will initially display some text telling the player that they can choose to play against another player or against the CPU.
When the player chooses Player vs Player, another text will appear instructing how to control each paddle.
When the player chooses Player vs CPU, a text will appear just for the player, instructing how to control their paddle.
Inside the main class, we need the following methods and attributes, along with a small
update in the Update method:
public class Game1 : Game
{
    public bool Start;
    ...
    protected override void Update(...)
    {
        ...
        if (Start)
        {
            playerPaddle.Update();
            cpuPaddle.Update();
            ball.Update();
        }
        else
        {
            ui.Update();
        }
        ...
    }
    public void Begin()
    {
        Start = true;
    }
    public void GameOver()
    {
        ball.Reset();
        Start = false;
    }
    public void SetCPUPaddleControllable(bool value)
    {
        cpuPaddle.IsControllable = value;
    }
    ...
}
Now, inside the UI class:
public class UI
{
...
private string text1, text2, text3;
private Vector2 text1Center, text2Center, text3Center;
private string playerInstructions, cpuInstructions;
private Vector2 playerInstrCenter, cpuInstrCenter;
private bool showInstructions;
private bool isPlayerVsCpu;
public UI(...)
{
...
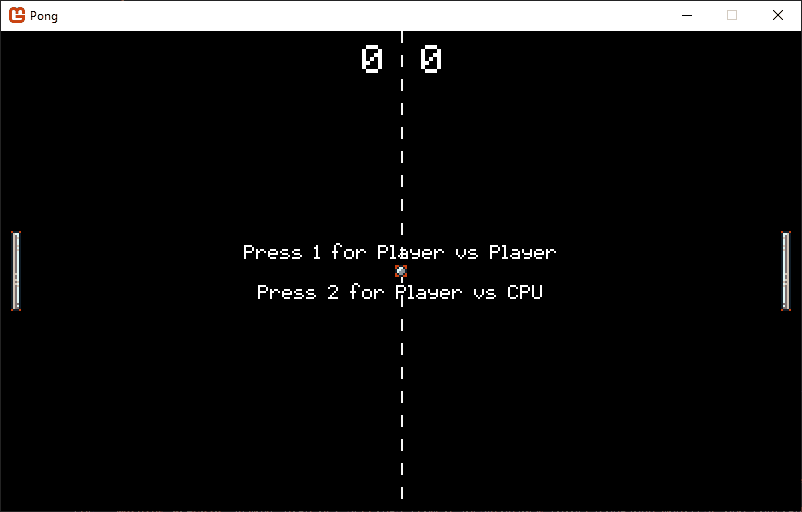
text1 = "Press 1 for Player vs Player";
text1Center = font.MeasureString(text1) / 2f;
text2 = "Press 2 for Player vs CPU";
text2Center = font.MeasureString(text2) / 2f;
text3 = "Press Space to Start";
text3Center = font.MeasureString(text3) / 2f;
playerInstructions = "Use W and S to \nmove the left paddle";
playerInstrCenter = font.MeasureString(playerInstructions) / 2f;
cpuInstructions = "Use I and J to \nmove the right paddle";
cpuInstrCenter = font.MeasureString(cpuInstructions) / 2f;
}
public void Update()
{
if (KeyboardManager.IsKeyPress(Keys.D1) && !showInstructions)
{
game.SetCPUPaddleControllable(true);
showInstructions = true;
isPlayerVsCpu = false;
}
else if (KeyboardManager.IsKeyPress(Keys.D2) && !showInstructions)
{
game.SetCPUPaddleControllable(false);
showInstructions = true;
isPlayerVsCpu = true;
}
}
public void Draw(...)
{
...
// display the selection screen
if (!game.Start && !showInstructions)
{
sb.DrawString(font, text1, new Vector2(screenCenter.X, screenCenter.Y - 20f),
Color.White, 0f, text1Center, 1f, SpriteEffects.None, 0f);
sb.DrawString(font, text2, new Vector2(screenCenter.X, screenCenter.Y + 20f),
Color.White, 0f, text2Center, 1f, SpriteEffects.None, 0f);
}
// display the left paddle instructions
if (!game.Start && showInstructions)
{
sb.DrawString(font, playerInstructions,
new Vector2(screenCenter.X * 0.5f, screenCenter.Y), Color.White, 0f,
playerInstrCenter, 1f, SpriteEffects.None, 0f);
// display the "Press play to start"
sb.DrawString(font, text3, new Vector2(screenCenter.X, screenCenter.Y + 100f),
Color.White, 0f, text3Center, 1f, SpriteEffects.None, 0f);
}
// display the right paddle instructions when player vs player is chosen
if (!game.Start && showInstructions && !isPlayerVsCpu)
{
sb.DrawString(font, cpuInstructions,
new Vector2(screenCenter.X + screenCenter.X * 0.5f, screenCenter.Y),
Color.White, 0f, cpuInstrCenter, 1f, SpriteEffects.None, 0f);
}
}
}
Ok, if we test:
Now we need to made just a little update:
public void Update()
{
    ...

    if (showInstructions && KeyboardManager.IsKeyPress(Keys.Space))
    {
        game.Begin();
    }
}
Showing the menu when gameover
Now we need a way to show the menu again:
// UI.cs
public class UI
{
    ...
    public void Reset()
    {
        showInstructions = false;
        isPlayerVsCpu = false;
    }
    ...
}

// Game1.cs
public class Game1 : Game
{
    ...
    public void GameOver()
    {
        ball.Reset();
        Start = false;
        ui.Reset();
    }
    ...
}

// Ball.cs
public class Ball
{
    ...
    public void Update()
    {
        ...
        if (Bounds.Right < -1f || Bounds.Left > screenSize.X)
        {
            game.GameOver();
            // Reset(); <-- remove this line
        }
        ...
    }
    ...
}
Really cool, finally if we test:
End
Hey, essentially the project is completed, then, i really, really appreciate for you not give upon me.
You can expect more guides from me. My goal is in some moment create a “Stardew Valley Guide”, but before that we need to start from somewhere.
Merry christimas ✨🎄
You are ready the next part:
Click to read Part 6 | still being written
🔮 Any question or suggestion, send me a message at:
👾 You can find the source code on Github