How To Create a Pong Game - Part 1
Introduction | Building the RectangleF and KeyboardManager classes
Hi 👋
I expect you have already seen my guide on How To Create A Snake Game because some basic concepts I will use here were explained in more details there. This means that for these concepts, I will be as straightforward as possible.
Therefore, I expect you already know how to import assets, draw and update images (I cover all of these topics in the Snake game guide).
Initializing A MonoGame Project
Obviously, you need to instantiate a project. If you don’t know what I am talking about, you can check my guide on How To Set Up and Use MonoGame. There I explain the installation process of MonoGame in both modern and older hardware and also explain how you can instantiate a project and run it.
Creating A New Rectangle Structure
In the Snake game guide, we used the MonoGame’s native Rectangle struct to work with our snake, but for this project, we will use an entirely new rectangle structure.
Why? Because the native rectangle structure works with integer values, and this will be a problem when we start to implement the movement of our paddles.
To give you a spoiler, our paddle will move by accelerating and decelerating, and in order to create a smooth acceleration effect, we need to use floating-point values, which is impossible with the Rectangle struct directly.
By the way, in the previous guide, we wrote all the code in the same file. However, as our project grows, it will become a torture to keep everything in one place. Therefore, in this guide, we will work with separate files.
Additionally, in this project, we will use many new features, such as getters, setters and vectors.
We can start in two different ways here:
- Writing our class above the main class and later moving it to a separate file (I often do this in my personal projects when I want to test something first)
- Creates a new class file and writing directly in it.
Both approaches lead to the same result.
For now, I will start with the first approach.
Above our main game class, let’s write a new class called RectangleF (a rectangle structure that uses float instead of integers):
public class RectangleF
{
    // implementation of our class here
}

public class Game1 extends Game
{
To create this class, we essentialy need two Vector2 properties: one for positioning and another for dimensioning.
All remaining properties (such as Left, Right, Top, and Bottom) are just references to these two.
public class RectangleF
{
    public Vector2 Position;
    public Vector2 Size;
}
To create the properties that will reference the sides of our rectangle we will use getters and setters.
It’s very simple:
public class RectangleF
{
    public Vector2 Position;
    public Vector2 Size; // X: width, Y: height
    public float X
    {
        get => Position.X;
        set => Position = new Vector2(value, Position.Y);
    }
    public float Y
    {
        get => Position.Y;
        set => Position = new Vector2(Position.X, value);
    }
    public float Left
    {
        get => Position.X;
    }
    public float Right
    {
        get => Position.X + Size.X;
    }
    public float Top
    {
        get => Position.Y;
        set => Position = new Vector2(Position.X, value);
    }
    public float Bottom
    {
        get => Position.Y + Size.Y;
        set => Position = new Vector2(Position.X, value - Size.Y);
    }
    public Vector2 Center
    {
        get => Position + Size / 2f;
        set => Position = value - Size / 2f;
    }
}
Note that:
...
public float Top // or any other property
{
    get => Position.X;
    set => Position = new Vector2(Position.X, value);
}
...
is equivalent to:
...
public float Top // or any other property
{
    get
    {
        return Position.X;
    }
    set
    {
        Position = new Vector2(Position.X, value);
    }
}
...
but is much more concise and straightforward.
Realize that we defined both getters and setters for the Top and Bottom properties, but for Left and Right, we only defined getters.
Why? Before explaining that, let’s me clarify why the Top and Bottom properties have a setters: these setters allow us to position
our structure by its sides instead of only by the position vector. However, during the project, you’ll notice that we won’t need to
position our structure using its left and right sides. We will only use these sides as references to implement logic, such as detecting game over or scoring.
The X and Y properties are just for convenience, making it easier to work with our structure. For example, if we want to move the structure along the x-axis, we can simply use rect.X = value instead of rect.Position.X = value
And why do we need a Center property as a Vector2? This property will be extremely helpful later.
By now, Position + Size might seem a bit confusing to you… And i get that.
From here on, you’ll see that you can perform mathematical operations with vectors, such as addition, subtraction, division, and multiplication.
The order of precedence also applies when performing calculations with vectors. For example, in Position + Size / 2f, Size / 2f will be calculated first and later the resulting vector will be added to Position.
Alright, now we need a constructor to initialize this structure when we want to use it:
public class RectangleF
{
    public Vector2 Position;
    public Vector2 Size;

    public RectangleF(float x, float y, float width, float height)
    {
        Position = new Vector2(x, y);
        Size = new Vector2(width, height);
    }
    public RectangleF(Vector2 position, Vector2 size)
    {
        Position = position;
        Size = size;
    }
    ...
}
Like MonoGame’s native rectangle structure, we need a method to detect intersections between two rectangles. So, let’s create one:
public class RectangleF
{
    ...
    public bool Intersects(RectangleF other)
    {
        return Top < other.Bottom && Right > other.Left && Bottom > other.Top && Left < other.Right;
    }
}
This method is essential because we’ll often need to check if the ball intersects with a paddle to reverse the ball’s direction of movement. Pretty cool, right?
Finally, we need one more thing: a method to convert our RectangleF into MonoGame’s Rectangle. This is necessary because the SpriteBatch.Draw method doesn’t recognize our custom structure. So, let’s create a method to handle this:
public class RectangleF
{
    ...
    public Rectangle ToRectangle()
    {
        return new Rectangle(Position.ToPoint(), Size.ToPoint());
    }
}
If you don’t know, the native Rectangle struct in MonoGame has two overloads (or, in other words, two ways to be instantiated).
One takes four integers as arguments:
(int x, int y, int width, int height)
and another takes two Point structs as arguments:
(Point position, Point size)
The Vector2 struct has a very useful method to convert the current vector structure into a point structure. This allows us to pass our position and size vectors and simply call their ToPoint methods.
The
Pointstruct also has a method to convert the current point structue to a vector structure calledToVector2
What this method does is allow us to pass a RectangleF instance to any method or class that expects a native Rectangle. By calling the ToRectangle on our structure, we can easily convert our RectangleF into a native Rectangle.
Essentially, we’ll use our custom rectangle structure during the development, but whenever we need a native Rectangle, we can call this method to convert it.
Creating A KeyboardManager
By default, MonoGame only catches key down and key up events:
- Key down is when you press a key from your keyboard and hold it (it returns true while holding and false otherwise)
- Key up is when you release a key (it returns true while is released and false when it’s still being held)
But sometimes we want to check if a key was pressed, meaning: it returns true only once when the key is pressed, regardless of whether the key is still being held down.
From here, I will start using class files:
Creating A Class File (VSCode)
Create a new file named as KeyboardManager.cs or any other name you prefer, but make sure it has the .cs extension.

After that, you need to write a structure very similar to the one we used to create our RectangleF class:
namespace Pong;

public class KeyboardManager
{
}
Make sure to include the namespace Pong directive as well; this is necessary for us to be able to use our class.
Tip
You can skip all these steps above by using the C# Extensions extension for VSCode:
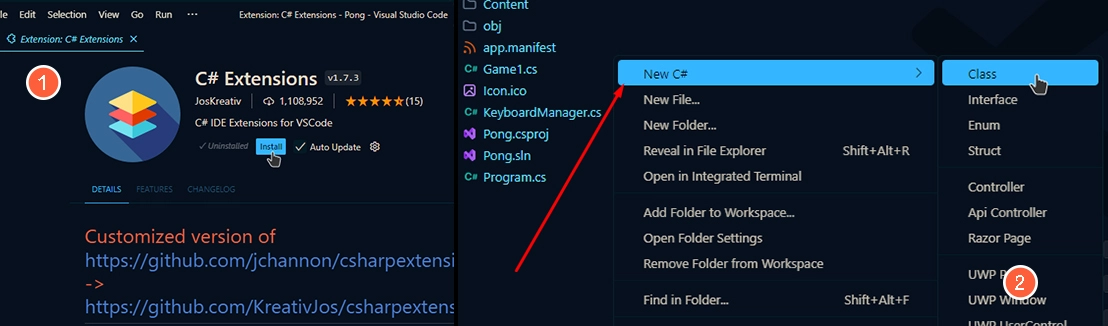
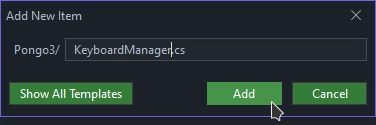
Creating A Class File (Visual Studio)
Go to your Solution Explorer section, right-click on the solution name, go to *Add, and click on New Item…

Type KeyboardManager and click Add (make sure the file extension is .cs)
Creating The KeyboardManager
We will create three static methods, which means we will be able to use our KeyboardManager anywhere without instantiating it.
using Microsoft.Xna.Framework.Input;

namespace Pong;

public class KeyboardManager
{
    private static KeyboardState previousKbstate;
    private static KeyboardState currentKbstate;
    public static void Update()
    {
        previousKbstate = currentKbstate;
        currentKbstate = Keyboard.GetState();
    }

    public static bool IsKeyPress(Keys key)
    {
        return currentKbstate.IsKeyDown(key) && !previousKbstate.IsKeyDown(key);
    }
    public static bool IsKeyDown(Keys key)
    {
        return currentKbstate.IsKeyDown(key);
    }
}
For now, don’t worry about trying to understand how this class works.
You just need to know that this is essentially everything we need to get started.
Testing
Let’s test our RectangleF class and our KeyboardManager.
Let’s instantiate our RectangleF class:
public class Game1 : Game
{
    private RectangleF rect;
    ...

    protected override void Initialize()
    {
        rect = new RectangleF(100f, 100f, 56f, 56f);
    }
}
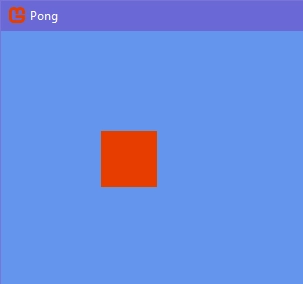
We will use this rectangle to draw an orange square (in the same way we did in the Snake game guide).
I will use the same 1x1px image i used there:
public class Game1 : Game
{
    ...
    protected override void Draw(GameTime gameTime)
    {
        ...
        _spriteBatch.Draw(whitepixel, rect.ToRectangle(), Color.MonoGameOrange);
        ...
    }
}
If so far you’ve done everything right, then:
Perfect, now we need to test our KeyboardManager. Let’s print some text to the console.
First, we need to enable the console in our MonoGame project, to do this:
Enabling The Console On VSCode
In the file explorer, open the .csproj file.
Look for the line <OutputType> and remove the Win word, resulting in just Exe, then save it:
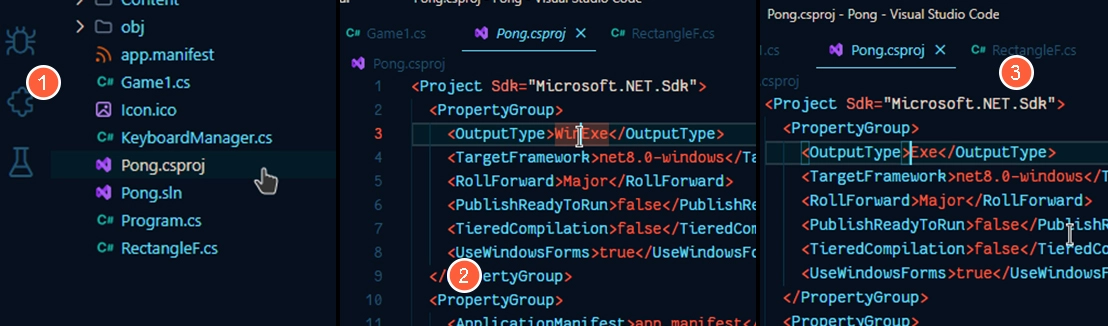
To disable the console just insert the Win again, resulting in WinExe.
If you forget to disable the console when building the release, your game will show the console every time it’s run. Keep this in mind!
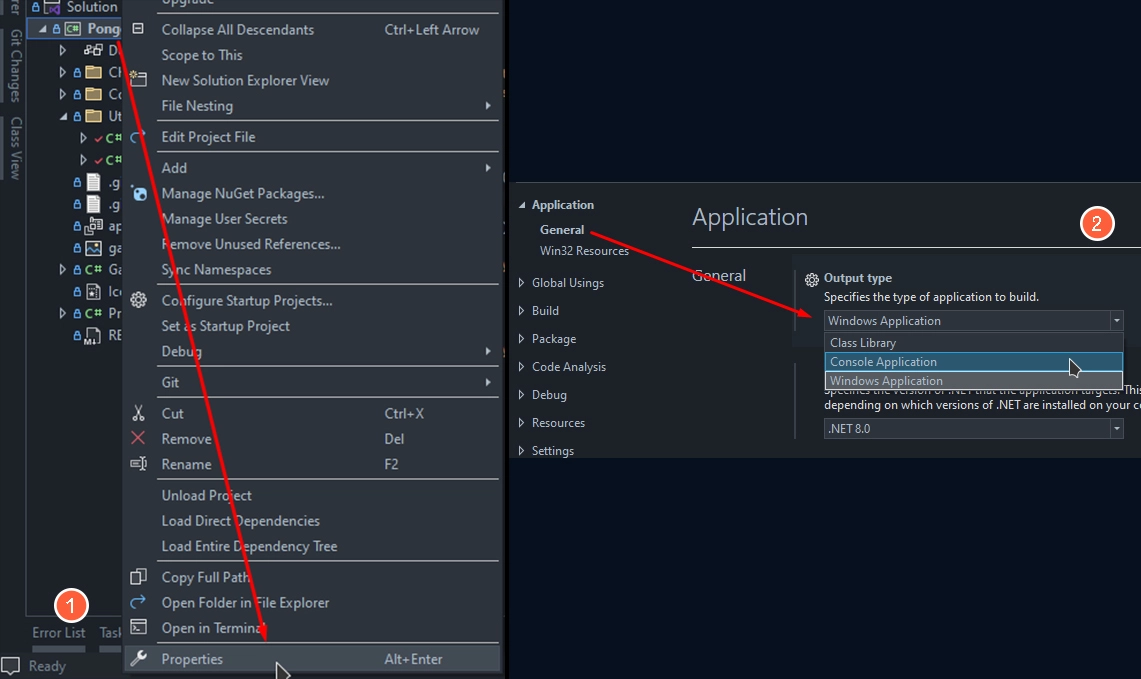
Enabling The Console On Visual Studio
Right-click on the project solution and select the Properties option at the end of the menu.
In the window that appears, click on General and under Output Type, select Console Application and save it.
Similarly to VSCode, to disable the console, you just need to do the reverse, selecting Windows Application instead.
Calling The Update Method Of KeyboardManager
At the very top of the Update method in the main class, we need to call the Update method of our KeyboardManager to use the IsKeyDown and IsKeyPress methods we implemented.
...
protected override void Update(GameTime gameTime)
{
    KeyboardManager.Update();

    ...
}
...
And yes, because we defined the Update method of the KeyboardManager as static, we don’t need to instantiate the class.
Remember: you should call KeyboardManager.Update just once globally!
All calls to IsKeyPress, IsKeyDown (or even IsKeyUp if you implemented it) should be made after the KeyboardManager.Update call.
Using IsKeyPress
The Update method of the main class in your MonoGame project probably already has the following declaration:
if (GamePad.GetState(PlayerIndex.One).Buttons.Back == ButtonState.Pressed || Keyboard.GetState().IsKeyDown(Keys.Escape))
    Exit();
let’s refactor this:
if (KeyboardManager.IsKeyPress(Keys.Escape))
    Exit();
If we run our project now, the window should close when we press ESC:
Right, but this doesn’t guarantee that IsKeyPress is returning true just once.
For testing this, let’s set an int variable outside of the update method.
We will increment this variable the longer we press some key:
...
private int count;
protected override void Update(GameTime gameTime)
{
    ...
    if (KeyboardManager.IsKeyPress(Keys.Space))
    {
        // same as count += 1
        count++;

        // you might need to import the `System` namespace or write it explictly (like `System.Console`)
        Console.WriteLine(count);
    }
    ...
}
Testing:
If everything is right, then you should see the value of count + 1 every time you press space just once, regardless
whether you’re holding space.
By the way, if you run you project using VSCode in debug mode, the output of the console should appear in the DEBUG CONSOLE.
If you run your project in release mode, then the console output should appear (probably) in the integrated TERMINAL.
In Visual Studio, an external terminal should appear, but the result is the exact same in all cases.
Using IsKeyDown
To test this, we only need to replace IsKeyPress with IsKeyDown:
...
protected override void Update(GameTime gameTime)
{
    ...
    if (KeyboardManager.IsKeyDown(Keys.Space))
    ...
}
Just by holding space for a little, count increases a hundred times in a short time.
Task
I have a little task to you: take all the code related to our RectangleF class from the main class and move it to a separate file
called RectangleF.cs.
End
Perfect, this is all we need for now.
If you managed to get this far with everything working well, then… Congratulations 🎉
You are ready the next part:
Click to read Part 2 | Creating the Player and CPU Paddles
🔮 Any question or suggestion, send me a message at:
👾 You can find the source code on Github